 Caleb Turner

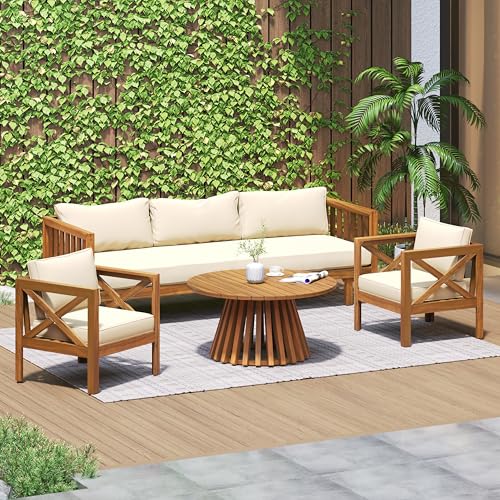
To bring back the beauty of your outdoor Acacia creations, I recommend starting with a thorough cleaning. Use a mixture of mild soap and warm water, applying it with a soft scrub brush to remove dirt and grime without scratching the surface.
After cleaning, allow the pieces to dry completely. Next, inspect for any signs of wear, such as scratches or faded areas. For minor imperfections, fine-grit sandpaper works wonders; just gently sand in the direction of the grain to maintain the surface integrity.
Once prepped, choose a high-quality outdoor sealant or oil specifically designed for similar materials. Apply with a clean cloth or brush, ensuring even coverage and paying close attention to any seams or joints. Allow it to cure as per the manufacturer’s instructions before placing your furnishings back in use.
Steps for Renewing Your Acacia Garden Seating
Start with a thorough cleaning of the surface using a mild soap and water solution. Gently scrub with a soft brush or cloth to remove dirt and grime.


Preparation Process
- Ensure that the furniture is completely dry before proceeding to the next step.
- Sand the surface lightly using fine-grit sandpaper to eliminate any rough spots and to promote adhesion for the protective finish.
- Wipe away dust created by sanding with a damp cloth.
Applying Protective Finish
Select a high-quality outdoor sealant or oil designed for exterior applications. Apply it using a brush or a clean cloth, following the natural grain.
- Apply a thin coat and allow it to soak in for the recommended time.
- For optimal protection, consider applying a second coat once the first one is fully absorbed and dried.
- Regular maintenance involves reapplying the protective layer every 6 to 12 months, depending on exposure to the elements.
This method will help maintain the beauty and durability of your outdoor décor for years to come.
Assessing the Current Condition of Acacia Furniture
Check for surface damage such as scratches, dents, or peeling finishes. Run your hand along the surface to feel for imperfections. If you notice rough patches, they need addressing before proceeding. Wipe the surface with a damp cloth to eliminate any dirt or debris that could interfere with treatment.
Identifying Signs of Wear
Look for signs of fading or discoloration, particularly in areas exposed to direct sunlight. Areas that appear lighter indicate that the finish is compromised. Pay attention to any signs of mold or mildew; these will require immediate attention to prevent further deterioration. Inspect joints and connections to ensure stability and check for any loose parts that may need tightening or repair.
Evaluating Moisture Damage
Assess for any warping or swelling, which indicates moisture exposure. To determine moisture retention, place a few drops of water on the surface. If the water beads up, the finish may still be intact. If it absorbs, deeper treatment may be necessary to restore protective qualities. It’s wise to consider the environment where this item is used, as humidity levels can significantly impact its condition.
Gathering Necessary Tools and Materials for Refinishing
For successful restoration, I compiled a list of specific tools and materials. These include a set of sanding blocks or an electric sander, which are crucial for achieving a smooth surface. Choose sandpaper with varying grits, typically starting from 80 and progressing to 220 for a fine finish.
Next, protect the surrounding area with drop cloths to avoid any mess. I also recommend having a high-quality cleaner designed for outdoor applications, along with scrub brushes and rags for thorough maintenance before starting the actual process.
Finishing Products
Invest in premium stains or sealants suitable for exterior surfaces; they enhance the natural appearance while providing necessary protection. A brush and foam applicators will ensure an even distribution. Additionally, gloves and safety goggles should not be overlooked to safeguard against chemical exposure.
Additional Supplies
Gathering masking tape will aid in achieving clean lines, while a paint tray can facilitate the application of stains. Keeping a vacuum or dust extractor on hand will help to remove the dust generated during sanding. Having these items ready ensures a smoother workflow and a better outcome for your project.
Preparing the Surface: Cleaning and Sanding
I begin by thoroughly cleaning the surface to remove dirt, grime, and any existing finish. Using a solution of warm water and mild soap, I scrub the surface with a soft brush or cloth. It’s crucial to avoid abrasive materials that could cause scratches. After scrubbing, I rinse the surface with clean water and allow it to dry completely before proceeding.
Removing Old Finishes
If the current coating is peeling or flaking, I use a paint stripper or a sander to eliminate all old finishes. I ensure I work in a well-ventilated area and wear appropriate protective gear. Following the manufacturer’s instructions for the paint stripper allows for effective results. If sanding, I opt for medium-grit sandpaper (around 120 grit) initially to tackle rough areas, progressively moving to finer grades (220 grit) for a smooth finish.
Final Sanding Steps
<pOnce all old finishes are removed, I make sure to sand in the direction of the grain to maintain the wood's integrity. This step is vital to prepare the surface for a fresh application, ensuring better adhesion of any new protective layers. After sanding, I wipe down the surface with a damp cloth to remove any dust and debris, allowing it to dry before the next steps.
Choosing the Right Stain and Finish for Acacia Wood
Selecting a suitable hue and protective coating significantly enhances the appearance and longevity of your exterior pieces. I recommend opting for high-quality penetrating stains designed for tropical species, as they adequately highlight the natural beauty while offering necessary protection against moisture and UV rays.
For color selection, consider shades that complement your landscape and existing décor. If you prefer a natural look, clear or lightly tinted options are ideal to showcase the rich grain and texture. Alternatively, deeper tones such as walnut or mahogany can create a striking contrast and lend a classic feel.
When it comes to finishes, the choice between oil-based and water-based products is crucial. Oil-based formulations tend to penetrate deeper, providing lasting moisture resistance, while water-based alternatives dry faster and offer easier cleanup. I typically choose oil-based stains for their durability, especially in exposed environments.
Ensure the finish contains UV inhibitors to ward off sun damage and prevent fading over time. Additionally, seek out products labeled as mold and mildew resistant; this can help maintain the aesthetic appeal of outdoor items.
Before application, conduct a test on a small, inconspicuous area to check for desired results. This step allows for adjustments before committing to the entire surface, ensuring satisfaction with the final outcome. Following these guidelines helps maintain the beauty and integrity of your exterior pieces throughout the seasons.
Applying Stain: Techniques and Tips for Even Coverage
For optimal application, I prefer using a high-quality synthetic brush or a foam applicator. Both tools offer good control and help achieve an even layer without brush marks.
Before I begin staining, I make sure to work in the shade. Direct sunlight can cause the stain to dry too quickly, leading to uneven coloration. I also ensure the surface is completely dry after cleaning and sanding.
Here’s my method for applying the stain:
- Pour a small amount of stain into a clean container. It’s better to work with less at a time to manage the application effectively.
- Apply the stain in the direction of the grain, using long, even strokes. This technique promotes uniform absorption and prevents blotching.
- For hard-to-reach areas or intricate designs, I utilize a smaller brush or a cotton cloth, carefully applying the stain where larger tools can’t reach.
- After the first coat, I wait a few minutes for the stain to penetrate before wiping off any excess with a clean cloth. This step is crucial to avoid sticky finishes.
Should I notice any uneven spots upon drying, I lightly sand those areas with fine-grit sandpaper once the stain is thoroughly dried. This will prepare the surface for a second coat. I usually recommend applying at least two coats for consistent color.
Additionally, I monitor the drying time between coats closely. Depending on the product used, it can vary greatly, and respecting these intervals helps ensure optimal results.
Finally, I always read the manufacturer’s instructions carefully. Some products might have specific recommendations that differ from standard practices.
Sealing the Finish to Protect Against Weather Elements
I recommend using a high-quality exterior sealer specifically designed for the type of finish applied. This step is crucial for safeguarding surfaces from moisture, UV rays, and temperature fluctuations.
Before applying the sealer, ensure the stain has thoroughly dried, which typically takes at least 24-48 hours, depending on environmental conditions. I prefer using a clear marine-grade polyurethane or spar varnish for their excellent protective qualities.
Here’s a simple method for sealing:
| Step | Action |
|---|---|
| 1 | Stir the sealer well to mix contents thoroughly. |
| 2 | Use a high-quality brush or a roller for even application. Avoid cheap tools that could shed bristles. |
| 3 | Apply the sealer in thin, even coats, checking for drips or runs. |
| 4 | Allow the first coat to dry completely–typically 6-8 hours in good conditions. |
| 5 | Lightly sand the surface with fine-grit sandpaper between coats to enhance adhesion. |
| 6 | Apply a second coat of sealer for added durability, repeating the drying and sanding process. |
| 7 | Finally, after the last coat has cured for several days, inspect for any missed spots and touch them up. |
Keep in mind any manufacturer instructions on reapplication frequency, especially if exposed to harsh weather conditions. My experience shows that reapplying every year or two significantly enhances longevity.
Proper sealing ensures not only aesthetic appeal but also structural integrity, so I take this task seriously to enjoy my investments for years to come.
Maintaining Refinished Acacia Furniture for Longevity
Regular cleaning is my first step to maintaining the longevity of my freshly treated items. I use a mixture of mild soap and water, applying it gently with a soft cloth to avoid scratches. After cleaning, I always rinse thoroughly with water to remove any soap residue, which could cause dullness over time.
To protect the surface, I reapply a suitable outdoor-friendly sealant every year. This practice helps shield the material from moisture and UV rays, extending its lifespan. I ensure that the surface is completely dry before applying any product; otherwise, it can trap moisture and lead to issues down the line.
I regularly inspect for any signs of wear, such as fading or rough patches. If I spot any damage, I promptly sand the affected area lightly and apply a touch-up stain to blend with the existing finish. This maintenance helps in preserving the overall appearance.
In addition, I store my pieces in a covered area during harsh weather conditions. If I have to leave them outside, I cover them with breathable fabric to prevent moisture accumulation while minimizing damage from rain and sun exposure.
I also encourage using coasters and placemats during gatherings to prevent scratches and water rings. Such habits can prevent unnecessary wear and keep surfaces looking pristine.
Lastly, it’s advisable to avoid placing the items directly on hot surfaces. Using appropriate pads or stands beneath pots and heated items can prevent surface burns, ensuring that my outdoor decor remains in top condition for years to come.