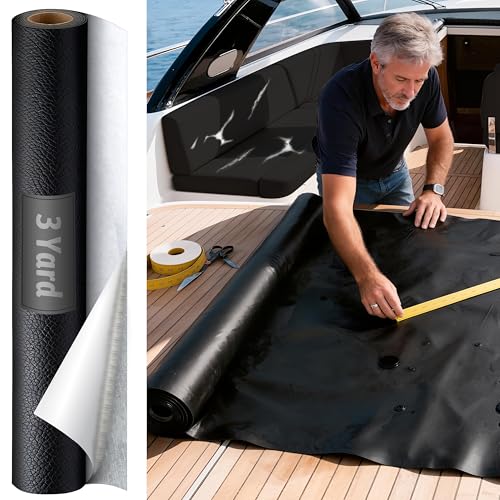


I recommend using a specific repair kit designed for synthetic materials, as this will provide the best results. Look for a kit that includes adhesive, patches, and repair tools tailored for this type of upholstery. These kits often come with detailed instructions to follow, ensuring a straightforward application process.
Before starting, clean the damaged area thoroughly with a gentle cleaner to remove dirt and oils. This step is crucial for proper adhesion. Once dry, cut the patch to size, ensuring it covers the damaged area completely while blending with the existing surface.
Apply adhesive from the kit to both the patch and the area around the damage. Press the patch firmly in place, ensuring a secure bond. Use a roller or smooth tool to eliminate air bubbles and ensure tight contact. Finally, allow ample time for the adhesive to cure, following the manufacturer’s recommendations for a lasting repair.
Patching Damaged Vinyl Seating
Begin with a meticulous cleaning of the affected area; use a mild soap solution to remove dirt and oils. Ensure the surface is dry before proceeding.

Select a vinyl repair kit that matches your upholstery’s color and texture. These kits often include adhesive, patches, and color compounds.
- Cut a patch that extends at least half an inch beyond the damaged area.
- Apply adhesive to both the patch and the furniture. Follow the manufacturer’s instructions for application.
- Press the patch firmly onto the damaged section, smoothing out any bubbles or wrinkles.
For color matching, mix the color compounds provided till it closely resembles your material. Use a small brush to apply the color compound around the patch edges to blend it seamlessly into the surrounding area.
- Allow the repair to cure as per the instructions, ensuring it’s undisturbed.
- Once dry, check if additional color touch-ups are necessary.
Regular maintenance includes cleanings with appropriate products and avoiding prolonged exposure to direct sunlight to ensure durability.
Identifying Damage Types on Faux Leather
Begin by examining the surface closely to differentiate between common issues: scratches, tears, and discoloration. Each type requires a specific approach to restoration.
| Damage Type | Description | Recommended Action |
|---|---|---|
| Scratches | Superficial marks that disrupt the texture but don’t penetrate deeply. | Use a soft cloth and a proper cleaner to restore the finish. |
| Tears | Rips that may extend through the layers, compromising structural integrity. | Consider using a suitable adhesive and a patch made from similar material for reinforcement. |
| Discoloration | Fading or staining due to sunlight exposure or spills. | Apply a color-restoring treatment or a dye appropriate for synthetic surfaces. |
Identifying the type of damage is the first step towards effective restoration. Always assess the severity to determine the appropriate repair method.
Gathering Necessary Materials for Patching
Begin with a good quality repair kit specifically designed for synthetic materials. Look for kits that include adhesives, color fillers, and patches that match the texture and color of your item.
Essential Tools
- Craft knife or scissors
- Cleaning cloth
- Sandpaper (fine grit)
- Measuring tape
Additional Supplies
- Adhesive or glue suitable for synthetic fabrics
- Color-matching paint or dye to blend repairs
- Patch material made from similar synthetic material
- Clear coat sealer for durability
Ensure all materials are ready before starting the repair process; this will make the task smoother and more organized, leading to better results.
Preparing the Surface for Repair
Clean the area thoroughly using a gentle soap solution and a soft cloth. This removes dirt and oils that could hinder adhesion. Rinse with a damp cloth and let it dry completely.
Inspect the damaged spot closely. Trim away any loose threads or frayed areas, ensuring the edges are clean and smooth. This step prevents further peeling and creates a better surface for application.
If there are deep scratches or holes present, consider using a filler specifically designed for synthetic materials. Apply it as needed and let it cure as per the manufacturer’s directions. Once cured, sand it lightly with fine-grit sandpaper for a seamless finish.
After preparing the surface, assess the color of the surrounding area. If necessary, have color-matching dye on hand to ensure a cohesive appearance after the repair is complete.
Selecting the Right Patch for Faux Leather
Choose a patch material that closely resembles the original surface. Look for polyvinyl chloride (PVC) or polyurethane patches, as they mimic the feel and appearance of synthetic upholstery. Additionally, assess the thickness; a patch should not be excessively thick, as it will create an uneven texture. For small tears, self-adhesive patches simplify the application process. Ensure the adhesive is suitable for use on synthetic textiles to prevent peeling over time.
Color matching is critical. Take samples to a fabric store and compare them against potential patch options. If the exact shade isn’t available, consider using paint designed for synthetic materials after applying the patch to achieve a better match.
For larger areas, look for embossed or textured patches that replicate the original grain. Some patches come with an adhesive backing; however, double-check the manufacturer’s instructions regarding heat application for optimal adhesion. Always test a small area first to confirm compatibility.
Lastly, do not overlook the importance of durable materials that can withstand regular use. Selecting the right product can significantly enhance the longevity and aesthetic of the repaired area.
Applying Adhesive Properly for a Secure Fit
For a strong bond, I begin by selecting the right adhesive that matches the materials involved. I prefer a flexible, strong formula specifically formulated for synthetic surfaces, ensuring durability and longevity. Before application, I make sure the surfaces are clean and dry to enhance adhesion.
Application Technique
I apply the adhesive evenly using a small brush or a fine-tipped applicator. It’s important to create a thin layer to prevent excess squeeze-out during pressing. I avoid applying too much pressure initially to allow for minor adjustments; once the fit is perfect, I press firmly for a solid bond.
Setting Time
After positioning the sections together, I ensure they remain undisturbed for the recommended setting time. Using clamps or heavy objects can help maintain pressure, ensuring the surfaces bond completely. Patience at this stage minimizes the risk of gaps and strengthens the repair significantly.
Blending Colors for a Seamless Repair
Mixing shades accurately is crucial for achieving a flawless look post-repair. I recommend starting with a small test area to find the right color match. Use a palette that includes fabric paints or dyes specifically made for synthetic materials.
Creating the Right Hue
To form the desired color, blend multiple tones. Begin with the base shade that resembles the original material. Gradually add complementary colors to adjust the tone to match the surrounding area. Adjusting in small increments allows for better control and minimizes the risk ofoversaturation.
Applying the Color
Once I achieve a satisfactory blend, I apply it with a small brush or sponge, carefully layering it on the repaired area. Gentle dabbing helps mimic the texture of the original surface. After application, I allow it to dry completely before assessing the need for additional layers.
Finalizing the repair involves sealing the color with a clear protective coat. This enhances durability and gives a consistent finish across the surface. Always revisit if necessary, to ensure that the new colors align perfectly with the original material.
Finishing Touches to Enhance Durability
Applying a protective sealant after the repair significantly increases longevity. I opt for a clear vinyl protectant that is compatible with synthetic materials. This coating acts as a barrier against moisture and UV rays, preventing further degradation.
Regular Maintenance
Incorporating regular care is key for sustaining the aesthetic and functional properties of the surface. I recommend cleaning with a mild soap solution followed by a gentle wipe using a microfiber cloth. This routine helps maintain appearance while restoring some of the material’s initial sheen.
Addressing Minor Scratches
For small imperfections, I utilize a color-matching dye or marker specifically designed for synthetic materials. I fill in scratches lightly, ensuring to blend well with the surrounding area. Regular touch-ups can help keep everything looking consistent and prolong the life of the item.
Maintaining Faux Leather After Patching
Regular cleaning is paramount for the longevity of furniture covered in synthetic materials. I recommend using a damp microfiber cloth to wipe down surfaces weekly, ensuring no dust or debris accumulates. For deeper cleaning, a mixture of mild soap and water works well–dampen the cloth with this solution, then wipe and dry the area thoroughly.
Conditioning for Preservation
Applying a conditioner specifically formulated for synthetic surfaces can greatly enhance durability. I usually choose a product that is silicone-based. After cleaning, I apply it sparingly, using a soft cloth in circular motions. This not only aids in flexibility but also prevents cracking.
Avoiding Sunlight and Heat Sources
I keep my synthetic-upholstered items away from direct sunlight and heat sources. UV rays can cause fading, while high temperatures can lead to drying and brittleness. Where possible, I use curtains or UV protection films on windows to minimize these effects.
Regular inspections are also vital. I check for any signs of wear or damage, addressing them immediately to prevent further deterioration. By taking these measures, furniture retains its appearance and function for a longer time.


