
 Caleb Turner

Applying a color-matched touch-up marker can conceal minor surface imperfections. Choose a marker similar to the existing finish for seamless blending. After application, allow it to dry thoroughly before gently buffing with a soft cloth.
If the damage is deeper, epoxy putty offers a reliable solution. Mix the putty as per package instructions, then press it into the affected area. Ensure it’s level with the surrounding surface. Once set, sand it down gently, and finish with a matching topcoat for a smooth appearance.
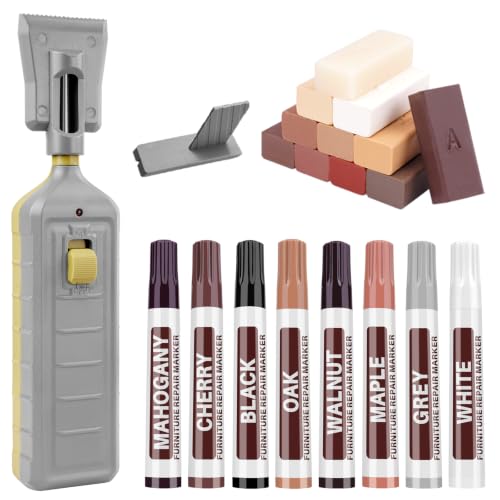

An alternative approach involves using wood filler for larger sections. Select a shade that complements the original hue. Once applied, smooth it out using a putty knife, and allow it to dry completely. After sanding, apply a clear sealant to enhance durability and maintain the integrity of the surface.
Repairing Damaged Surface Areas
I recommend using a repair kit specifically designed for surface restoration. These kits often include color-matched putty which can seamlessly blend into the existing finish. First, clean the area meticulously to eliminate dirt and debris. Apply the putty using a plastic scraper, ensuring it fills all gaps completely.
After the application, let it dry according to the manufacturer’s instructions. Once set, lightly sand the surface with fine-grit sandpaper to achieve a smooth finish. Finish off by applying a protective coating, such as a clear topcoat, to enhance durability and match the sheen of the surrounding area.

Using Contact Paper for Quick Solutions
<p.Another practical approach involves utilizing adhesive contact paper. Choose a design that complements the existing style. Cut a piece slightly larger than the damaged section. Clean the surface thoroughly, peel off the backing, and carefully apply the paper, smoothing out any air bubbles to ensure a smooth adhesion.
This method not only conceals imperfections but also provides an additional protective layer against future damages. Ensure the edges are pressed firmly to prevent peeling.
Applying Touch-Up Paint for Minor Scratches
<p.For minor scratches or scuffs, a touch-up pen or paint is highly effective. Select a color that closely matches the piece. After cleaning the area, apply the paint directly onto the scratch using the pen’s applicator. Allow sufficient drying time, and consider applying a clear sealant for extra protection.
This quick remedy can significantly restore the appearance of your item without extensive effort.
Identifying the Type of Damage on Your Laminate Surface
Begin by examining the area closely. Look for signs of peeling, scratches, or deeper gouges. For surface-level issues, light reflection can help reveal smaller imperfections that might not be immediately visible.
Next, determine whether the layer reveals any underlying materials. If you see a contrasting color or texture under the surface, it indicates a more significant concern than a mere scratch or nick.
Check the edges and corners for any signs of separation from the core structure. This could be a result of moisture exposure or mechanical stress. Identifying this early can save effort down the line.
Finally, for areas that feel rough or uneven, gently run your fingers over the surface. Any notable differences in texture may indicate wear that requires different remedies. Understanding the extent of the damage guides the approach for restoration.
Gathering Necessary Materials for Repair
For a successful repair of a damaged surface, I begin by collecting specific items. Here’s a detailed list of what I find helpful:
- Repair Kit: Look for a kit formulated for synthetic surfaces, which typically includes putty or filler designed for color matching.
- Craft Knife: An exacto or utility knife is essential for precise removal of any loose material around the damage.
- Sandpaper: Fine grit (around 220) is necessary to smooth the area before applying any filler.
- Putty Knife: A must-have for spreading the filler evenly into the repair area.
- Paint or Touch-Up Marker: Choose a color similar to the original finish for blending; I always test these on a hidden spot first.
- Cloth: A soft, lint-free cloth helps to clean the area before starting the repair process.
- Clear Sealer: A final coat to protect the repaired section and enhance durability.
Optional Tools and Materials
If the damage is extensive or if I’m looking for a more polished finish, I consider these additional materials:
- Wood Filler: If the damage is deep, a wood-based filler helps to build up the area before finishing.
- Hairdryer: Useful for drying the filler or paint faster, ensuring quicker progress.
- Masking Tape: I use this to outline the repair area, preventing any overrun of filler or paint onto the surrounding surface.
Gathering these materials in advance ensures a smoother and more organized repair process. I always double-check to ensure I have everything needed before starting the project.
Applying Laminate Repair Paste or Filler
I recommend using a high-quality repair paste or filler specifically designed for surfaces like mine. Begin by carefully shaking the tube or container to ensure even mixing. Following the manufacturer’s guidelines, apply the paste directly into the damaged area using a small spatula or putty knife. Make sure to fill the void completely, so the surface is level with the surrounding area.
For deeper imperfections, I’ve found that applying the product in thin layers can help achieve a smooth finish. Allow each layer to dry per the instructions before adding the next. The drying time can vary depending on the product, but it’s best to wait at least an hour between applications.
| Step | Action |
|---|---|
| 1 | Shake the repair paste container to mix thoroughly. |
| 2 | Use a spatula to fill the damaged area with the paste. |
| 3 | Apply in thin layers if the damage is deep. |
| 4 | Allow each layer to dry completely before adding more. |
After achieving a smooth surface, I lightly sand the area with fine-grit sandpaper to blend it seamlessly with the surrounding material. This step is critical for avoiding any noticeable height differences. Following sanding, wipe the area clean with a damp cloth to remove dust particles and debris.
Finally, consider applying a coat of clear sealant or matching finish to protect the repair and enhance the overall appearance. This may extend the life of the repair, ensuring that the surface remains intact for a longer time.
Color Matching and Applying Touch-Up Paint
To achieve a seamless blend with your existing surface, start by selecting the correct color. Bring a small sample of the damaged area to a hardware or paint store that offers color matching services. They often use machines that can accurately replicate the hue of your material.
Testing the Color
Before applying the paint directly, test it on a hidden spot or an inconspicuous section. Allow it to dry completely, as colors may shift when wet. Assess how well it matches and adjust if necessary by mixing additional pigments.
Application Process
Using a fine brush or applicator, apply the touch-up paint carefully to the repaired area. Work in thin layers to maintain control and avoid excess buildup. Wait for each layer to dry before adding another, ensuring a smooth and even finish. For added depth, consider using a clear coat over the painted spot to enhance durability and sheen.
Regularly inspect the finish after it dries. If the match isn’t perfect, you can lightly sand the area and reapply to refine the blend. Patience during this phase can yield a professional-looking result.
Finishing Touches: Sealing and Protecting the Repaired Area
After addressing the imperfections, it’s crucial to apply a protective sealant to ensure long-lasting results. A good option is a clear topcoat, which can provide a durable barrier.
Steps for Application
- Choose a compatible sealant based on the earlier materials used. Look for options like polyurethane or a resin-based finish.
- Ensure the repaired area is clean and dry before proceeding with application.
- Using a fine brush or a foam applicator, apply a thin layer of sealant. Opt for long, even strokes to avoid uneven coverage.
- Allow the first coat to dry completely. Follow the manufacturer’s recommendations for drying times.
- Once dry, lightly sand the surface with fine-grit sandpaper. This helps in achieving better adhesion for the next layer.
- Apply a second coat of sealant, repeating the drying and sanding process.
Final Touches
After the last layer has dried, inspect the area for any needed touch-ups. If the sheen varies from the surrounding surface, consider adjusting with a matte or satin finish sealant to blend seamlessly.
Regular care is necessary; avoid aggressive cleaning products that can damage the surface. Instead, use a damp cloth for cleaning and maintain the aesthetic integrity of the piece.
Preventive Measures to Avoid Future Chips and Damage
I recommend placing coasters and protective mats under items to minimize the risk of scratches and dents. These surfaces act as a barrier against sharp edges and heavy objects.
Regularly using a soft cloth for cleaning can prevent buildup of dirt and grime that may lead to deterioration. Avoid abrasive cleaners or scouring pads that can scratch the finish.
Consider applying a layer of adhesive sealant to corners and edges. This creates an additional protective layer that absorbs impacts better than the existing surface.
Ensuring good humidity control in the environment is vital. Excessive moisture can warp materials, while extreme dryness may lead to cracking. Use a humidifier during winter months if necessary.
Be cautious with hot items. Always use trivets or mats under hot dishes to prevent thermal shock that may cause damage. Direct heat can compromise integrity over time.
I find it helpful to rearrange objects periodically. This avoids prolonged pressure on specific points, reducing the likelihood of indentations.
Finally, inspect regularly for minor issues. Early detection and addressing of small imperfections can prevent them from escalating into larger problems later.
FAQ:
What are the common causes of chips in laminate furniture?
Chips in laminate furniture often occur from regular wear and tear, such as moving items across surfaces, accidental impacts, or heavy usage. Additionally, exposure to moisture can weaken the adhesive that holds the laminate, leading to peeling or chipping. Kids and pets can also contribute to damage, as their activities may cause unintentional scratches or dents.
What materials do I need to fix a chip in my laminate furniture?
To repair a chip in laminate furniture, you’ll typically need a few materials. First, a laminate repair kit is beneficial as it often contains color-matched filler and adhesive. You’ll also need a utility knife for preparing the area, sandpaper for smoothing any rough edges, and a clean cloth for removing dust. Depending on the size of the chip, you might want some paint or touch-up pens to match the color of the laminate surface, and clear topcoat can be helpful for added durability.
Can I repair a large chip or should I replace the whole laminate surface?
For large chips, it can be more challenging, but repairs are often still possible. It depends on the extent of the damage. If the chip is deep and compromises structural integrity, you might consider replacing the laminate surface. However, many large chips can still be repaired using putty or resin, followed by sanding and painting to blend with the surrounding area. If you’re unsure, consulting a furniture repair specialist can provide guidance tailored to your specific situation.
How long can I expect the repair to last?
The longevity of a repair depends on the materials used and the level of care given to the repaired area. Quality repair kits can provide a long-lasting finish, often standing up to regular use for several years. However, chips repaired with lower-quality materials or those that experience heavy wear may require touch-ups or further repairs sooner. To extend the life of the repair, avoid harsh cleaning agents and consider using coasters or pads to protect surfaces from impacts.


