The first step I recommend is to assemble all necessary supplies. A quality air-compressor system, appropriate nozzles, and a variety of finishes such as acrylic or latex are essential for achieving optimal results. It’s also wise to have safety gear like masks and goggles on hand to protect yourself during the process.
Surface preparation cannot be overlooked. Start by thoroughly cleaning the item, removing any dust or grease. Sand the surface lightly to promote adherence and fill any imperfections with appropriate filler. Don’t forget to wipe it down again after sanding to eliminate dust particles. This ensures a smooth base for the next steps.
Next, adjust the pressure settings on your compressor. For most applications, a pressure of 20-30 psi works best, allowing for even coverage without excessive overspray. Set up a designated work area, preferably outdoors or in a well-ventilated space, to avoid fumes and maintain a tidy environment.
When you begin applying your coating, maintain a consistent distance of about 6-12 inches from the surface. Move in a steady, sweeping motion, overlapping each pass slightly to prevent any uneven areas. This technique provides an even coat and reduces the likelihood of drips.
Lastly, allow adequate drying time between coats, usually 30 minutes to an hour, depending on the product used. After the final layer, let the piece cure for at least 24 hours before handling it to ensure durability and a long-lasting finish.
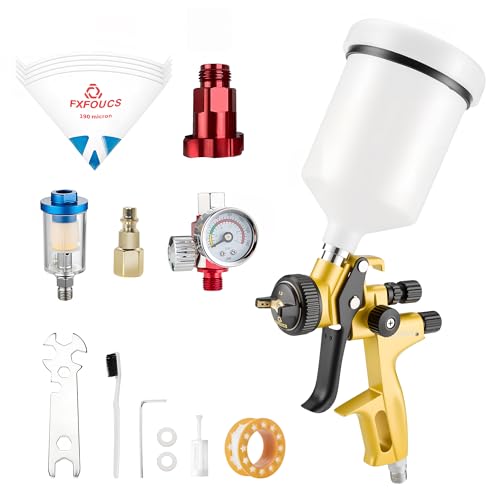
Choosing the Right Spray Equipment for Furniture Finishing
For achieving the best results in furniture finishing, selecting the appropriate application tool is paramount. I recommend opting for a model that features adjustable fluid flow and nozzle sizes. This flexibility allows you to tailor the application process to different surfaces, from intricate details to larger, flat areas.
Nozzle Types
Different nozzle types play a significant role in the finishing process. A fine nozzle works brilliantly for detailed trim work, while a wider option can cover larger surfaces more efficiently. If you intend to switch between various tasks, consider a tool with interchangeable nozzles.
<h3=Material Compatibility
Assessing material compatibility with the equipment is critical. Some tools are designed to work with specific finishes, such as water-based or solvent-based solutions. Check manufacturer specifications to ensure that the unit can handle the materials you plan to use for optimal performance and durability.
Preparing Surfaces for Optimal Coating
Clean the surface thoroughly to remove dust, grease, and old coatings. I usually use a damp cloth with a mild detergent for this task, followed by a dry cloth to ensure no moisture remains.
Next, I address imperfections. For wooden pieces, sanding is crucial. I begin with medium-grit sandpaper to even out the surface, then switch to fine-grit for a smooth finish. Each area should feel uniform to the touch.
For items with significant imperfections, applying a wood filler can help. After it dries, I sand it down until it’s flush with the surrounding area. This step guarantees that the new layer adheres properly and appears seamless.
If the original finish is glossy, I lightly scuff the surface with sandpaper to create a better bond for the new layer. This preparation is key in avoiding future peeling or chipping.
Before proceeding, remove hardware such as knobs and hinges. This ensures an even coating and prevents obstruction during application. If needed, I tape off areas that shouldn’t be coated to achieve crisp lines.
A final wipe with a tack cloth removes any remaining dust particles, ensuring a clean canvas for the new finish. I make sure that the environment is well-ventilated and dust-free to achieve the best results.
Selecting the Appropriate Paint and Thinner
Choosing the right coating is critical. I prefer water-based acrylics for their quick drying time and low odor. They provide a durable finish and are easy to clean up. For a glossy look, alkyd paints are an excellent choice, offering a hard, long-lasting surface.
Consider the surface you’ll be working on:
- Wood: Look for paints designed specifically for wood. These often contain additives that enhance adhesion and durability.
- Metal: Specialty paints for metal are essential to prevent rust and ensure proper adherence.
- Laminate: A bonding primer followed by acrylic paint works best to ensure proper coverage and durability.
An appropriate thinner helps achieve the right viscosity for the application method. I typically use water for water-based products; it allows easier adjustments to consistency without sacrificing quality. For oil-based formulations, mineral spirits are my go-to.
Tips for Mixing
Always mix paint thoroughly to ensure an even finish. If unsure of the ideal consistency, refer to the manufacturer’s instructions. A good rule of thumb is to aim for a mix that resembles the viscosity of whole milk.
Testing Your Mixture
After preparing your mixture, do a test spray on a scrap piece of material. This step clarifies if adjustments are necessary, guaranteeing that the final application meets your expectations.
Mastering the Spray Technique for an Even Finish
I recommend maintaining a consistent distance of 6 to 12 inches between the nozzle and the surface to achieve uniform coverage. A fixed distance allows for better control and minimizes the risk of dripping or pooling.
To enhance precision, I often adopt a sweeping motion, moving either horizontally or vertically. This technique ensures that each stroke overlaps slightly with the previous one, allowing for a seamless transition without any missed spots.
Adjusting the air pressure is another key factor. Generally, lower pressure settings help produce a finer mist, reducing the chances of orange peel texture. I typically keep the pressure between 20 to 30 PSI for most applications, but it can vary depending on the material and the desired finish.
I always test the application on a scrap piece before tackling the main project. This allows me to refine my technique and adjust as needed, ensuring the final look meets my expectations.
Finally, patience is crucial. I apply several thin coats rather than one thick layer. Each coat should dry before the next application, ensuring an even finish without running or sagging.
Cleaning and Maintaining Your Equipment After Use
To ensure longevity and optimal performance of your equipment, it’s crucial to clean it immediately after each session. I start by disassembling the parts, removing the nozzle and needle. This allows for thorough access to any areas that may have leftover substances.
Flush and Rinse
I fill a container with the appropriate solvent based on the medium used–water for water-based formulations or mineral spirits for oil-based ones. After that, I gently pour or inject the solvent through the feed tube to flush out any remaining residue. A soft brush or cloth is useful for scrubbing hard-to-reach areas.
Drying and Storage
After rinsing, I thoroughly dry each component. I avoid leaving any moisture to prevent rust or build-up. Once dry, I store everything in a clean, dry environment, ensuring that parts don’t touch each other to avoid scratches. I occasionally apply a light coat of lubricant to keep moving parts functioning smoothly and to make future clean-ups easier.
Safety Precautions While Using a Spray Device
Wear a respirator with a suitable filter while working in areas with poor ventilation. This protects against inhaling harmful particles and fumes. Ensure the mask fits securely to avoid leakage.
Always wear personal protective equipment, including goggles and gloves. Eye protection prevents overspray from entering the eyes, while gloves protect skin from contact with chemicals.
Workspace Setup
Set up a well-ventilated area, ideally outdoors or in a space with good air circulation. Remove flammable materials and cover nearby surfaces to avoid unintended overspray.
| Safety Measure | Description |
|---|---|
| Respirator | Use with appropriate filters to prevent inhalation of harmful vapors. |
| Protective Gear | Goggles and gloves shield against harmful contact and particles. |
| Fire Safety | Keep a fire extinguisher nearby and avoid sparks from electrical devices. |
| Proper Disposal | Dispose of leftover materials according to local regulations to avoid environmental harm. |
Emergency Readiness
Know the location of emergency equipment like first aid kits and fire extinguishers. Familiarize yourself with local emergency contact numbers.
Test the equipment before beginning. This includes checking the respirator filters and ensuring all protective gear is in good condition.
FAQ:
What materials do I need to paint furniture with a spray gun?
To paint furniture using a spray gun, you’ll need several materials. Firstly, you require a quality spray gun suitable for the type of paint you plan to use, such as latex or acrylic. You’ll also need paint, thinner (if required), a stir stick for mixing, and protective gear like gloves and a mask. Additionally, prepare drop cloths or newspapers to cover the surrounding area and sandpaper or a sanding block for surface preparation. Finally, a clean, dry cloth will help remove any dust or debris from the furniture before you start painting.
How do I prepare my furniture before painting with a spray gun?
Preparation is key to achieving a smooth finish when painting furniture with a spray gun. Begin by removing any hardware, such as knobs and hinges, for an even coat. Clean the surface thoroughly to remove dust and grease. If the furniture has a shiny or glossy finish, sand it lightly with fine-grit sandpaper to help the paint adhere better. Wipe down the surface with a clean cloth to remove any sanding debris. Finally, consider applying a primer if the material is particularly porous or if you’re making a significant color change, as this will provide better coverage and durability.
What technique should I use for spraying paint onto furniture?
When using a spray gun, begin by practicing your technique on a scrap piece of material if possible. Hold the spray gun approximately 6-12 inches away from the surface and use smooth, even strokes. Start your stroke before the edge of the furniture and release the trigger after passing the edge to avoid drips. Overlap each pass by about 50% to ensure even coverage. It’s often best to apply multiple thin coats instead of a single thick one, allowing each coat to dry completely before applying the next. This method reduces the risk of dripping and helps achieve a professional finish.
How long does it take for spray paint to dry on furniture?
The drying time for spray paint can vary based on factors such as the type of paint used, humidity, and temperature. Generally, most spray paints will be touch dry within 30 minutes to an hour. However, it is advisable to allow the paint to cure fully for at least 24 hours before handling or applying any additional coats. For optimal results, refer to the manufacturer’s instructions on the paint can for specific drying and curing times.
What should I do if I accidentally get runs or drips while spraying?
If you notice runs or drips while spray painting furniture, do not panic. Allow the section to dry completely before attempting to fix it. Once dry, gently sand the area with fine-grit sandpaper to smooth it out. After sanding, wipe the area clean with a cloth to remove any dust. You can then apply a light coat of paint over the repaired area to blend it with the surrounding surface. Always take care to maintain an even hand when spraying to minimize the chance of runs or drips in the future.
What type of paint should I use with a spray gun for furniture?
When painting furniture with a spray gun, the choice of paint is significant. Generally, acrylic paints, latex paints, and specialized spray paints designed for furniture are excellent options. Acrylic and latex paints provide good adhesion and durability, making them ideal for indoor furniture. Make sure to check if the paint is suitable for the specific material of your furniture, such as wood, metal, or plastic. It’s also beneficial to select paint that comes in a sprayable form, or you can thin conventional paints with a suitable solvent as per the manufacturer’s instructions to achieve the right consistency for spraying.


