

To address imperfections in your premium hardwood pieces, I recommend using a combination of wood filler and a color-matching stain. Start by cleaning the area to remove dust and debris, which ensures better adhesion of the filler. Choose a high-quality wood filler that closely matches the natural hue of the timber.
Once you apply the filler to the affected area with a putty knife, let it dry completely. After it hardens, gently sand the surface with fine-grit sandpaper until it’s smooth and even with the surrounding wood. For a perfect finish, use a stain that matches the original tone of the wood. Apply it with a cloth, following the grain, to blend the patched area seamlessly.
Finally, consider sealing the treated section with a clear coat to protect the surface and enhance its durability. This not only preserves the aesthetic appeal but also prolongs the lifespan of your beloved wood items. Regular maintenance will help prevent future issues and keep your pieces looking pristine.
Repairing Defects in Wooden Pieces
First, clean the area around the imperfection using a soft cloth to remove dust and debris. This ensures proper adhesion of the filling material. Then, use a wood filler that matches the color of the grain. Apply it into the opening with a putty knife, making sure to fill it completely. Smooth the surface level with the surrounding area and let it dry as recommended by the manufacturer.
Sanding and Finishing
Once dry, gently sand the filled spot with fine-grit sandpaper. It’s crucial to follow the grain direction to blend the repair seamlessly. After achieving a smooth surface, clean off the dust again. Lastly, choose a suitable finish–oil or varnish that corresponds with the piece’s original coating. Apply the finish with a brush, ensuring an even coat and allowing each layer to dry thoroughly before applying additional coats.
Preventing Future Issues
To safeguard against future deterioration, regularly apply a protective sealant. Keep the piece in a stable environment, avoiding excess moisture or direct sunlight. Periodically inspect for any new imperfections, addressing them promptly to maintain the integrity of the wood.
Identifying the Type of Crack in Teak Furniture
Before addressing an issue with wooden pieces, I first categorize the blemishes based on characteristics. Understanding the nature of each imperfection improves the outcome of any restorative efforts.
- Surface Splits: These are usually shallow and found on the outer layer. They occur due to changes in humidity and are often more an aesthetic concern than structural.
- Deep Fissures: If the opening penetrates more than the surface, it’s crucial to assess the extent. These can weaken the item significantly if not treated correctly.
- Check Cracks: A pattern of small, straight lines may indicate drying out. This type may not compromise structural integrity but should be addressed to prevent further spread.
- Gaps at Joints: These appear where two pieces connect. If I notice separation, I check the joinery for damage, as it can compromise stability.
After identifying the type, I determine the appropriate course of action, ensuring that the solution aligns with the damage’s specifics and severity.
Gathering Necessary Tools and Materials
For effective restoration work, I ensure I have the following tools and materials ready:
Tools Required
Putty Knife: A flexible putty knife aids in applying filler smoothly into the split.
Sandpaper: I choose fine-grit sandpaper for surface smoothing and preparation prior to finishing.
Clamps: Adjustable clamps are critical for holding sections together while adhesive sets.
Utility Knife: A sharp utility knife assists in trimming any excess filler cleanly.
Materials Needed
Wood Filler: A quality wood filler matching the hue of the wood is essential for a seamless finish.
Wood Glue: A strong adhesive specifically designed for wood ensures durability during the restoration process.
Finish Oil or Varnish: Choosing a compatible oil or varnish will help restore the original sheen and protect the surface.
Paint Brush or Cloth: I prefer using a brush or cloth for even application of oils or finishes.
Having these items on hand streamlines my workflow and contributes to a successful enhancement of my cherished items.
Cleaning the Cracked Area Before Repairing
Before proceeding with any restoration, I ensure that the damaged section is meticulously cleaned. I start by removing any dust, dirt, or debris that may have settled within the fissure. This can often be achieved by using a soft brush or a microfiber cloth. It’s important to be gentle to avoid causing further damage.
Next, I prepare a solution of warm water mixed with a small amount of mild soap, which I apply using a soft sponge. This helps to lift any oils or residues that could hinder adhesion. After applying the solution, I thoroughly rinse the area with clean water and use a clean towel to dry it completely. Ensuring that the surface is dry is critical prior to any further application.
Tools I Use
| Tool | Purpose |
|---|---|
| Soft Brush | Remove loose particles |
| Microfiber Cloth | Wipe down the surface |
| Sponge | Apply cleaning solution |
| Warm Water | Prepare cleaning solution |
| Mild Soap | Lifts oils and residues |
| Towel | Dry the cleaned area |
Finally, I check the area for any remaining impurities before moving on to the next steps in my restoration process. A clean surface ensures that any fillers or treatments applied later will adhere properly and provide a lasting effect.
Applying Wood Glue for Small Cracks
For minor fissures, I choose a high-quality wood adhesive that will effectively bond the surfaces. I carefully squeeze a small amount of the glue directly into the gap, ensuring it fills the entire void. To facilitate penetration, I use a small wooden stick or a toothpick, applying gentle pressure to push the adhesive deeper.
After adequately filling the chasm, I wipe away any excess with a damp cloth. This prevents any visible residue on the surface once the adhesive dries. I allow the glue to set according to the manufacturer’s instructions, typically a few hours, or overnight for best results.
If necessary, I check the bond strength by gently pressing the repaired area after the recommended drying time. If it feels secure, I lightly sand the surface using fine-grit sandpaper to achieve a seamless finish. I make sure to wipe the area again to remove any dust before applying a suitable finish product to match the original sheen.
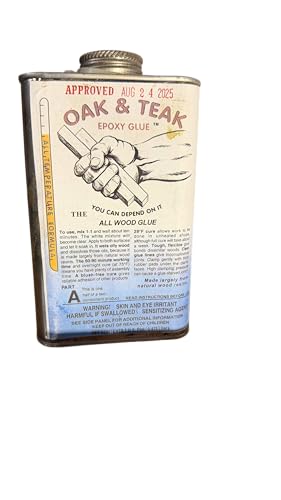
Using Epoxy for Larger Cracks in Teak
For substantial fissures, I opt for a high-quality epoxy resin. This provides a durable solution that blends seamlessly with the wood. First, I mix the resin according to the manufacturer’s instructions, ensuring I achieve the right consistency for filling voids.

Application Process
Before applying, I clean the area thoroughly to remove any debris or dust. I then gently clamp the sides of the opening together, if possible, to facilitate the filling process. Using a small putty knife, I carefully apply the mixed epoxy into the gap, making sure to overfill slightly to account for any shrinkage as it cures.
Curing and Finishing Touches
I allow the epoxy to cure completely, following the recommended time. Once set, I sand the area flush with the surrounding grain using fine-grit sandpaper. To enhance the finish, I apply a suitable wood conditioner or oil, restoring the natural luster and ensuring uniformity across the surface.
This method has proven reliable for not just functionality but also aesthetics, bringing life back to cherished pieces.
Sanding the Repaired Area for a Smooth Finish
After the adhesive has thoroughly cured, I focus on achieving a seamless surface. I begin by selecting fine-grit sandpaper, typically between 180 to 220 grit, which helps prevent further damage to the wood while smoothing the area. With the sandpaper in hand, I gently sand the repaired section, moving with the grain of the wood. This technique avoids unsightly scratches that could mar the aesthetic of the piece.
Technique and Approach
To ensure uniformity, I frequently check my progress by running my fingers over the area; any uneven spots will be evident. I apply light pressure, avoiding excessive force that could compromise the repair. If working on larger areas, I sometimes use a sanding block to maintain a flat surface. I continuously wipe away dust with a clean, damp cloth, allowing me to see the surface clearly as I work.
Finishing Touches
Once satisfied with the smoothness, I proceed to refine the finish. If additional sanding is necessary, I switch to an even finer grit, such as 320, to achieve a polished surface. Finally, I ensure that the area is completely free of dust before applying any finish or oil to restore the wood’s natural beauty. This careful attention to detail enhances the overall appearance and durability of my piece, ensuring it looks revitalized and well-maintained.
Staining and Finishing the Repaired Surface
After addressing the damaged area, I ensure that the patch blends seamlessly with the original. Selecting a suitable stain is crucial; I often harvest samples from the furniture or use color swatches to find the right match. It helps to test the stain on a small, inconspicuous area first to gauge how it reacts with the wood.
I apply the stain using a soft cloth or brush, working with the grain to avoid streaks. Multiple thin layers yield a more even finish; letting each coat dry thoroughly is key before adding the next. I frequently find that three coats provide optimal depth and color.
For the finishing touch, I prefer a high-quality finish, such as a penetrating oil or polyurethane. Depending on the desired sheen, I might opt for matte or satin. Applying the finish again demands a cloth or brush while ensuring even coverage across the entire surface.
Once the finish is completely dry, I lightly sand the surface using fine-grit sandpaper. This step enhances smoothness and allows for further refinements in the final coat. After sanding, I wipe away any dust with a tack cloth before applying the last layer of finishing material.
Finally, I let the piece cure for a recommended period, ensuring durability before use. Maintaining the integrity of the original piece while ensuring the repaired section is indistinguishable is always my aim.
Preventive Measures to Avoid Future Cracks
Controlling the environment where my beloved pieces reside is crucial. I ensure the humidity levels remain stable; ideally between 45% and 65%. This helps maintain moisture content and reduces the likelihood of splitting.
Regular Maintenance
Applying a suitable finish regularly is effective. I use oil or a protective sealant every six months to keep the surface nourished and prevent drying out.

- I inspect surfaces for signs of wear or damage during oil application.
- Keeping surfaces clean helps prevent grime buildup, which can promote deterioration.
Controlled Exposure
I avoid placing items in direct sunlight or near heat sources. Using curtains or shades in sunlit areas helps minimize temperature fluctuations.
- Positioning a dehumidifier or humidifier as needed maintains ideal moisture levels.
- Avoiding rapid temperature changes around my items also reduces stress on the material.
By following these guidelines, I find that my cherished pieces remain beautiful and intact for years to come.
Maintaining Teak Pieces to Extend Lifespan
Regularly applying a high-quality teak oil every six months protects the wood’s natural beauty while preventing moisture damage. This enhances resistance against the elements, which is crucial for outdoor settings.
Utilize a soft cloth for dusting to avoid scratches. Stains should be wiped immediately with a damp cloth to prevent deep absorption. For deeper cleaning, a mixture of mild soap and water can be used sparingly.
Consider using a UV protection product that will shield surfaces from sun exposure. This is particularly important for items that are frequently outdoors, as it helps maintain color and prevent fading.
Inspect joints and fastenings regularly to ensure everything remains tight and secure. Loose parts can lead to structural issues over time, so retightening screws or bolts as necessary is advisable.
Position items away from direct heat sources, such as fireplaces or radiators. Extreme heat can cause drying and lead to other deformities. Furthermore, placing coasters or mats beneath hot items will help mitigate potential damage.
Finally, covering furniture with protective tarps during harsh weather can shield it from rain, snow, and debris, thereby extending its lifespan significantly.
FAQ:
What are the common types of cracks found in teak furniture?
Teak furniture can develop several types of cracks over time, with the most common being hairline cracks, which are small and often superficial. These cracks can occur due to changes in humidity and temperature. Deeper cracks, sometimes called splits, can result from more significant stress or improper care. It’s important to assess the severity of the cracks, as this will influence the repair method you should choose.
Should I use wood filler to repair cracks in teak furniture?
Using wood filler can be a viable option for fixing cracks in teak furniture, especially for larger or deeper cracks. However, it is essential to choose a high-quality filler that matches the color and texture of teak wood. After applying the filler according to the manufacturer’s instructions, it should be sanded down until smooth. Finally, refinishing the area with teak oil or a similar product can help blend the repair with the surrounding wood.
How can I prevent further cracking in my teak furniture?
To prevent further cracking in teak furniture, maintaining consistent humidity and temperature levels in the room is crucial. Avoid placing the furniture in direct sunlight or near heating vents, as these conditions can cause the wood to dry out and crack. Regularly applying teak oil can also help to keep the wood hydrated and protected, reducing the likelihood of future damage.
What materials do I need for repairing cracks in teak furniture?
For repairing cracks in teak furniture, you will need a few essential materials, including wood glue or wood filler, sandpaper in various grits (fine and medium), a putty knife for applying filler, and teak oil or a similar finish for refinishing the area. Having a clean cloth on hand can also be helpful for wiping away excess product and for polishing the finished surface.
Can I repair cracks in teak furniture myself, or should I hire a professional?
Repairing cracks in teak furniture can be a DIY task, especially for minor cracks. If you feel comfortable with basic woodworking skills, such as sanding and filling, you can likely handle the repair yourself. However, for significant damage or if you’re unsure about the process, consulting a professional furniture restorer may be a wise choice. They have the experience and expertise to ensure that repairs are done correctly and that the furniture maintains its aesthetic appeal.


