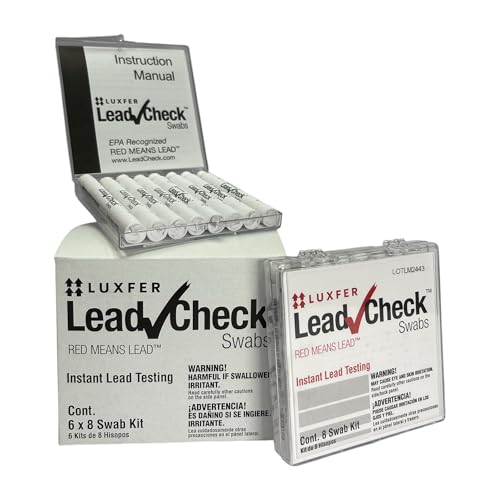
I recommend utilizing a simple test kit to determine if vintage pieces of wood have harmful coatings. These kits can be purchased from hardware stores or online, often including detailed instructions for use. The process is straightforward: apply the testing solution to a discreet area and observe for any color change indicating the presence of toxic substances.
Additionally, try rubbing a damp cotton swab on the surface. If the swab picks up color, particularly a hue similar to red or orange, this could signal a reason for concern. Always ensure that you’re in a well-ventilated area when carrying out these checks.
For further peace of mind, it’s prudent to consult professionals who can conduct more thorough inspections. Many communities offer resources for safe restoration or disposal of items that contain harmful materials, ensuring both safety and preservation of your cherished pieces.
Identifying Toxic Coatings on Wood Pieces
I recommend using a lead test kit available at hardware stores for accurate results. These kits typically include swabs that change color in the presence of harmful substances. Follow the instructions carefully, ensuring to apply the swab to a tiny, inconspicuous area where the finish is intact.


If you suspect older items may contain harmful coatings, searching for signs of wear or chipping is crucial, as deteriorating surfaces can release particles into the environment. Pay attention to layers – multiple colors indicate possible renovations, which might include substances of concern.
For an immediate visual check, observe the color and texture. Bright, glossy finishes from past decades are often suspect. Examine any flaking; if the residue is powdery or dust-like, it might signal a higher risk of hazardous elements. Be cautious and consider proper disposal or professional assessment for your safety.
Consulting historical records can provide insight into the age of pieces. If they date back to the early 20th century or earlier, it’s wise to assume they may contain harmful materials. Enlisting a trained specialist for thorough evaluation can offer peace of mind and ensure safety in your living space.
Understand the Risks of Lead-Based Coatings Exposure
Exposure to toxic materials from older coatings can lead to serious health issues. Children are especially vulnerable, as their developing bodies absorb contaminants more easily. I recommend focusing on the following points to mitigate these risks:
- Neurological Damage: Even low levels can adversely affect cognitive functions, leading to learning disabilities and behavioral problems.
- Physical Health Issues: Adults may face complications like hypertension, kidney damage, and reproductive issues, which can be severe and long-lasting.
- Environmental Concerns: Dust and chips from deteriorating surfaces can contaminate the home environment, posing ongoing risks.
Regular monitoring and immediate action upon noticing wear or deterioration can minimize exposure. For specific communities, local health departments often provide resources and guidance tailored to address contamination risks effectively.
Testing for hazardous substances and utilizing protective measures, such as personal protective equipment during renovations, can greatly decrease the chance of exposure. Understanding the nature and scope of these risks empowers me to take necessary precautions.
Visual Inspection Techniques for Lead Paint
Examine the surface for signs of chipping, peeling, or flaking. These conditions often indicate the presence of toxic substances beneath the exterior layer. Pay close attention to corners and edges where damage is more likely to occur.
Observe the color and texture. Older coatings tend to have a distinct dullness compared to modern finishes, which are typically glossier. Look for unusual discoloration or variations in hue that might suggest multiple layers of coating.

Use a magnifying glass to inspect for any unusual patterns or textures that may give clues about the age and composition of the coatings. Small cracks or bubbles in the surface may also signal deterioration.
Test the area around hardware points such as hinges and knobs, as these spots often accumulate dust and debris, which can obscure the paint’s true appearance.
Check for any odor emanating from the material. A musty smell can indicate degradation, possibly suggesting harmful chemicals within the finish.
If the piece is made of wood, tap gently on the surface. A dull thud could point to thicker coatings that may contain harmful ingredients. Listen for differences in sound that could indicate hidden layers.
Consult a color chart specific to historical finishes, which can help provide context for what shades were common in different periods. This knowledge assists in evaluating whether the coatings align with the era the item is from.
Finally, document everything through photographs to track the condition. This can aid in potential further testing or restoration decisions later on.
Conducting a Lead Paint Test with Kits
The simplest way to assess the presence of hazardous materials in older pieces is to use a testing kit designed for at-home use. These kits are widely available in hardware stores and online. Before starting, I recommend reading the instructions carefully; they vary between brands.
Steps to Perform the Test
First, gather your materials: a test kit, a damp cloth, and gloves. Wipe down the surface of the item to remove dust or debris, which can interfere with the accuracy. Next, follow the specific instructions for applying the testing solution. Typically, this involves applying a few drops of the chemical solution to a scrape or a small area of the surface. Observe any color change indicated by the kit. Most kits provide a color chart for interpreting results.
Interpreting the Results
If the test surface changes color, it often indicates the presence of hazardous substances. Some kits will specify the levels detected. For results outside safe levels, disposing of the item or seeking professional assistance for remediation is advisable. Keeping records of testing is also wise, as it can be useful for future reference or when selling items.
Using XRF Analyzers for Accurate Detection
The use of XRF (X-ray fluorescence) analyzers provides precise measurement of hazardous materials contained in coatings and surfaces. This handheld technology delivers instant results, allowing me to quickly assess whether a surface may contain harmful substances.
When I operate an XRF device, I point the probe at the area of interest and activate the scan. The instrument emits X-rays that interact with the materials, enabling detection of various elements. It is particularly proficient at measuring heavy metals, yielding quantitative data in parts per million (ppm).
For a thorough investigation, I ensure the area is clean and free from dust. I often perform multiple scans on different sections to confirm consistency in results. This multiple approach minimizes the chance of false negatives.
Calibration of the device is crucial, and I regularly check the performance using standard reference materials. I also keep the manufacturer’s guidelines on hand to better understand the limitations of the analysis, such as interference from other materials present.
While XRF analyzers offer fast and accurate readings, I complement this with visual inspections and other testing methods for a comprehensive assessment. This multi-faceted approach strengthens my analysis and provides peace of mind regarding safety.
Identifying Hazardous Coatings on Various Material Types
I recommend focusing on the specific characteristics of different materials to determine the presence of harmful coatings effectively. Each type has unique signs and testing considerations.
Wood Surfaces
For wooden items, scratches or chips in the surface usually expose underlying layers. Look for a chalky texture, which may indicate an exterior coating application. A simple test involves rubbing a damp cloth on the surface; if residue comes off, it often signifies an unsafe coating.
Metal Elements
Metal surfaces often reveal tell-tale signs through peeling or flaking. It’s important to inspect any joints or seams thoroughly, as these areas can trap hazardous deposits. A quick swab test using specific kits designed for metal surfaces can provide results for harmful substances.
Plastic Components
For items made from plastic, examine for discoloration or a dull appearance, which can suggest the presence of unsafe finishes. Since plastic is less likely to show signs of deterioration in the same way as wood or metal, using a testing kit specifically for plastic surfaces is advisable.
Overall, knowing the material type helps tailor the assessment and ensures a more accurate detection of any hazardous coatings present.
Recognizing Signs of Paint Chipping or Wear
To quickly assess the condition of coated surfaces, I inspect for visible signs of chipping, flaking, or rough areas. A close look reveals deterioration that may indicate potential hazards associated with older finishes.
Visual Clues to Look For
The following indicators suggest a compromised finish:
| Sign | Description |
|---|---|
| Flaking | Small pieces of coating peeling away, often around edges and joints. |
| Chipping | Defined sections where the surface has broken off, revealing the underlying material. |
| Discoloration | Areas that appear faded or have an uneven color, indicating wear or weather exposure. |
| Rough Texture | Surfaces feeling gritty or rough to the touch can signal degradation. |
What to Do Next
If I notice these signs, testing for harmful substances is crucial. Collect samples from damaged areas, avoiding disturbance to the surrounding sections. Using a testing kit or seeking professional analysis provides clarity on safety concerns. Always prioritize caution when dealing with any suspect materials.
Best Practices for Handling and Removing Lead Paint
Always wear appropriate personal protective equipment (PPE) such as gloves, a mask, and goggles when dealing with hazardous surfaces.
Before starting any removal process, ensure the area is well-ventilated. Open windows and use fans to circulate air, minimizing inhalation of harmful dust.
- Wet methods are preferred for scraping or sanding. Keep surfaces damp to reduce dust creation.
- Use a fine-grade sanding sponge rather than power sanders to minimize dust.
- Use chemical strippers specifically designed for hazardous coatings, following the manufacturer’s instructions.
Contain all waste material in sealed plastic bags or containers. Properly dispose of paint chips and debris according to local regulations, considering hazardous waste disposal facilities.
After removal, clean the surfaces with wet rags and dispose of them immediately. This helps eliminate any remaining toxins.
- Consider encapsulation for surfaces that cannot be fully stripped; this involves applying a coating that seals the hazardous layer underneath.
- Regularly monitor encapsulated surfaces for signs of wear or damage, reapplying as necessary.
Always consider hiring certified professionals for large-scale projects or when uncertainty exists about the safest removal methods.
Finally, ensure thorough cleaning after work is completed, using HEPA vacuums to capture any remaining particles. Check local regulations for specific cleanup protocols and requirements.
FAQ:
What are the signs of lead paint on furniture?
Lead paint can be identified by several signs. Look for chipping or peeling paint, as older layers, typically pre-1978, may contain lead. You may also notice a dull finish compared to modern paints. If the furniture has been painted multiple times, check for a layered appearance, as lead paint was often used in earlier layers. Additionally, if the paint has a sweet taste when you lick it (which is not advised), that could indicate the presence of lead.
How can I test furniture for lead paint?
You can test furniture for lead paint using several methods. One of the most accessible is a lead testing kit, available at hardware stores. These kits often include swabs that change color in the presence of lead. Alternatively, you can hire a certified professional to conduct a more thorough evaluation using X-ray fluorescence (XRF) equipment, which can detect lead without damaging the furniture. If you suspect significant lead exposure, seeking professional help is advisable.
What should I do if I find lead paint on my furniture?
If you discover lead paint on your furniture, it’s crucial to handle the situation carefully. First, avoid disturbing the paint, as this can create dust that is hazardous. If the paint is in good condition, keeping it intact is usually safer than removing it. However, if you need to remove it, consider hiring a licensed lead abatement contractor who can safely manage the removal process. Always ensure that children and pets are kept away from the area until it has been resolved.
Are there any long-term effects of exposure to lead paint?
Long-term exposure to lead paint can have serious health implications, especially for children. It may result in developmental delays, learning difficulties, and behavioral problems. In adults, lead exposure can lead to various health issues, including hypertension, kidney damage, and reproductive problems. If you suspect you or your family members have been exposed, it’s important to seek medical advice and appropriate testing.
What are safe practices for restoring or repainting furniture that may have lead paint?
When restoring or repainting furniture that may contain lead paint, it’s important to follow safe practices. First, test for lead as mentioned before. If lead is present and you decide to proceed with restoration, wear protective gear like gloves and a mask to prevent inhalation of dust. Use wet sanding techniques to minimize dust and clean the area thoroughly afterward. Consider sealing the furniture with a non-toxic paint or sealant that does not contain lead. If you feel uncertain, consulting a lead-safe certified contractor is recommended.
How can I tell if my old furniture has lead paint?
To determine if your old furniture contains lead paint, you can follow a few steps. First, consider the age of the furniture; items manufactured before 1978 are more likely to have lead paint, as many regulations regarding its use were implemented in that year. You can perform a simple lead test using a commercially available lead testing kit, which typically includes wipes or swabs that change color upon contact with lead. If you’re unsure or uncomfortable conducting the test yourself, you can contact a professional who specializes in lead inspection. It’s important to handle any suspected lead-painted furniture with care, and avoid sanding or scraping the surface, as this may release harmful dust.
What should I do if I find lead paint on my furniture?
If you discover that your furniture has lead paint, it’s crucial to take precautions to ensure safety. First, avoid using the piece in a way that might cause paint to chip or wear off, particularly in areas where children play or touch the furniture. You have several options for dealing with lead paint: you can safely encapsulate the painted surface using lead paint encapsulants, which provide a protective barrier, or you can hire a certified professional to remove the lead paint entirely. Disposal of any lead-painted items must also be done carefully; check local regulations on how to dispose of hazardous materials. Always prioritize safety and health when dealing with potential lead exposure.