The key to achieving a precise opening in a flat-pack item lies in meticulous planning and the right tools. First, choose the spot wisely; measure multiple times to ensure accuracy. A simple measuring tape and a level can save you from costly mistakes.
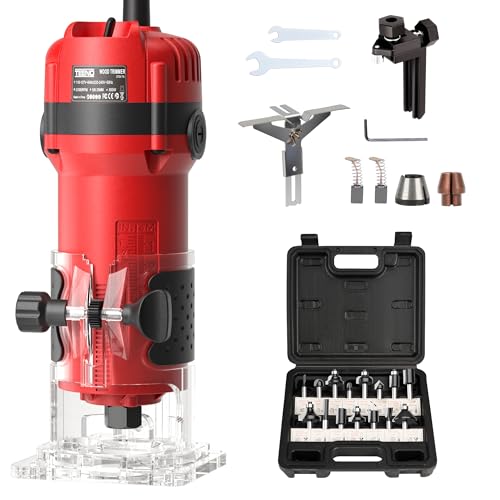
Next, gathering the appropriate instruments can significantly affect the quality of the work. A jigsaw or a router is essential, depending on the material and the size of the cut you want. Always use a fine-toothed blade for smoother edges, as it will minimize splintering and provide a cleaner finish.
Once the location is marked and tools are ready, securing the piece is crucial. Clamping it down prevents movement during the process, enhancing safety and precision. Start slowly, allowing the tool to guide you for a neat outcome. Lastly, smooth the edges with sandpaper to eliminate any rough spots, completing the transformation with a polished look.
Techniques for Creating Openings in Home Fixtures
I prefer to mark the desired area with a pencil for precision, outlining the dimensions of the opening clearly. After that, I use a drill with a suitable bit to create starter holes at each corner. This helps guide the saw blade. For straight edges, a jigsaw is my tool of choice, allowing for smooth cuts. Employing a fine-toothed blade minimizes chipping. If the surface is laminated or veneered, using painter’s tape along the cut line protects against peeling.


Finishing Touches
Once the opening is complete, I sand the edges lightly to ensure they are smooth. A coat of paint or veneer can be applied to blend the edges with the surrounding surface. This process not only enhances aesthetics but also protects the cut area from moisture. If necessary, adding a trim can provide a polished look while covering any discrepancies from the cutting process.
Safety Measures
I always prioritize safety by wearing protective eyewear and gloves. Ensuring my workspace is clear of obstacles reduces the risk of accidents. Utilizing clamps to secure the material while working stabilizes it and allows for more accurate results. Following these precautions makes the undertaking much safer and more efficient.
Choosing the Right Tools for Cutting
For precision and ease, I recommend a jigsaw, as it’s versatile and well-suited for various materials. Its ability to maneuver around curves makes it ideal for shapes that deviate from standard lines.
Additional Tools to Consider
- Drill: Use a drill to create a starter hole, which will help guide the jigsaw blade.
- Router: A router provides cleaner edges and can achieve intricate designs.
- Utility Knife: For thinner materials or a clean preliminary cut, a utility knife is handy.
Safety Gear is a Must
Always wear safety glasses to protect your eyes from debris. A dust mask can also be beneficial to avoid inhaling particles. Finally, gloves offer a firm grip and safeguard against sharp edges.
In my experience, preparing the work area and ensuring all tools are in good condition enhances the overall cutting process and results.
Measuring and Marking the Cut Area
For precision, I begin by measuring the required dimensions of the area to be removed. A tape measure serves well for this task, allowing me to note down both width and height accurately.
Next, I use a pencil or fine marker to outline the cut area. It’s crucial to apply light pressure to avoid damaging the surface while marking, ensuring I can easily erase it later if necessary.
| Step | Detail |
|---|---|
| 1. Measure | Determine the exact size needed with a tape measure. |
| 2. Mark | Lightly draw the outline of the area on the surface to be modified. |
| 3. Verify | Double-check the dimensions against your intended design to confirm accuracy. |
After marking, I take a moment to review the layout from different angles to ensure alignment with other components. Any adjustments must be made before proceeding, as refining at this stage prevents errors later in the process.
Finally, ensuring all measurements are precise before initiating the transformative process is key to achieving a clean and professional result.
Preparing the Furniture for Cutting
Ensure that the surface is clean and free from dust or debris to avoid complications during the modification process. I always use a damp cloth to wipe down the area, allowing it to dry completely before proceeding.
Next, remove any items or hardware from the section where the modification will occur. This includes shelves, drawers, or any removable features that might obstruct the work.
Stabilizing the piece is crucial. I recommend placing it on a sturdy surface, like a workbench, and securing it with clamps to prevent movement while working. If the item is large, enlisting help can provide additional stability.
If the item is laminated or coated, lightly sanding the area around the planned modification can reduce chipping and ensure a cleaner edge. Use fine-grit sandpaper for this step, applying just enough pressure to roughen the surface without damaging the material.
Assess all sides of the item to ensure that the placement of the modification will not compromise its structural integrity. I find it helpful to visualize the final look beforehand by outlining the area where the modification will take place, confirming that the design aligns with my vision.
Finally, gather all necessary safety gear including gloves, goggles, and a dust mask to protect from debris and dust during the process. Taking these precautions ensures both safety and precision in the project.
Step-by-Step Cutting Techniques
For precise openings, I rely on the following methods:
- Drilling a Pilot Hole: Begin with a drill to create a small pilot hole in the designated section. This serves as a guiding point for larger cutting tools.
- Using a Jigsaw: Attach a fine-toothed blade suitable for the material. Carefully guide the jigsaw along the marked line, ensuring the blade remains perpendicular to the surface. Maintain a steady pace for clean results.
- Router Application: For rounded or intricate edges, a router can be beneficial. Utilize a straight bit for basic openings or a spiral bit for curved designs. Secure the board properly before routing.
- Scroll Saw Technique: For highly detailed and delicate designs, a scroll saw provides the best control. It allows for intricate cuts without excessive force.
After the cutting, I smooth the edges using sandpaper to eliminate any splinters or rough patches, ensuring a refined finish.
Throughout the process, wearing safety goggles and a dust mask is crucial to protect my eyes and lungs from debris.
Finishing Edges After Cutting
To achieve a polished look, I apply edge banding to the freshly exposed surfaces. Selecting adhesive edge banding that complements the original finish of the piece is crucial. I cut the banding slightly longer than needed, allowing for adjustments during application.
Using a household iron set to a low temperature, I place a clean cloth over the banding and gently press down for a few seconds, allowing the adhesive to activate. This method provides an even attachment without damaging the underlying material.
After the banding cools, I trim the excess with a sharp utility knife, holding the blade at a slight angle to avoid tearing the material. This step ensures a clean transition between the original surface and the added banding.
I finish by sanding the edges lightly with fine-grit sandpaper. This process helps to smooth any rough spots and blends the banding seamlessly into the surrounding area. Finally, I apply a clear finish or sealant to protect the edges, enhancing durability and maintaining the appearance.
Tips for Common Mistakes to Avoid
Ensure accurate measurements before proceeding. Double-check dimensions to prevent miscalculations that can lead to regretful errors.
Neglecting safety gear can lead to injury. Always use goggles and gloves while working to protect yourself from debris and sharp edges.
Test the tools on a scrap piece first. Familiarizing yourself with the equipment will reduce the chance of mistakes on your project piece.
Common Oversights
Failing to adequately mark the cutting area can result in uneven edges. Use clear, visible lines to guide your work precisely.
Forgetting to secure the piece can lead to movement during the process. Use clamps to stabilize everything before starting to manipulate the material.
Mismanaging Clean-Up
Don’t overlook the finishing touches. Rounding the edges not only improves aesthetics but also ensures safety. Invest time in smoothing any rough spots after the procedure.
Finally, remember to tidy up promptly. A clean workspace fosters better focus for future projects and prevents accidents caused by clutter.