I’m going to recommend using weather-resistant materials like cedar or pressure-treated pine for lasting durability. These woods naturally resist decay and pests, making them ideal choices for items that will endure the elements. For an added layer of protection, consider applying a high-quality sealant to preserve the wood’s integrity over time.
Taking precise measurements is crucial before cutting any materials. I suggest sketching out designs on paper first, allowing for adjustments to ensure everything fits together seamlessly. At this stage, a well-thought-out plan can save time and prevent costly mistakes in the construction process.
Using screws instead of nails can strengthen the overall structure. For joints, employ brackets or connectors to enhance stability, especially for larger pieces like tables that see heavy usage. Tools like saws, drills, and sanders are essential for achieving clean edges and smooth surfaces, so have them ready for action.
Don’t overlook the finishing touches. Adding cushions can enhance comfort, while outdoor paint can introduce color and style. Choose upholstery designed to withstand sun exposure and moisture to maintain their look and feel throughout the seasons.
Follow these specific tips, and you’ll be well on your way to creating functional and stylish outdoor space that complements your living area.
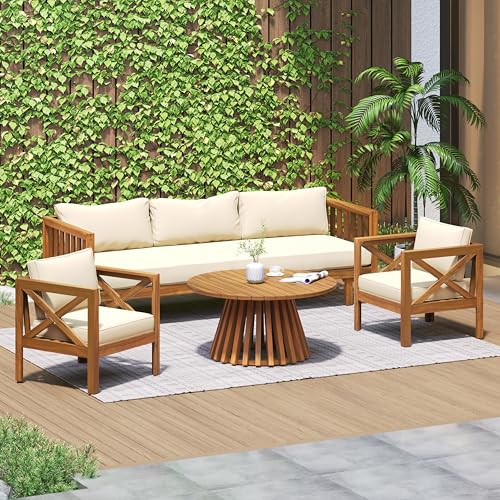
Creating Custom Seating Solutions
Choosing durable materials is crucial. I recommend using hardwoods like teak or cedar, as they are naturally resistant to moisture and pests. For a budget-friendly option, pressure-treated pine works well, but should be sealed properly to extend its lifespan.
Dimensions and Design
For chairs, a seat height of 18 inches is standard, while armrest height typically ranges from 24 to 28 inches. Eye-catching designs such as adirondack or lounge styles add character while providing comfort. Sketching plans ensures accuracy during assembly.
Assembly Tips
Using exterior-grade screws or bolts will enhance stability and durability. Pre-drilling holes prevents wood from splitting. I always apply a weather-resistant finish to protect against the elements, ensuring longevity and a polished appearance.
| Material | Durability | Cost |
|---|---|---|
| Teak | High | $$$ |
| Cedar | Medium | $$ |
| Pine | Low (requires treatment) | $ |
Choosing the Right Materials for Durability
I opt for pressure-treated wood like cedar or redwood, which resist rot and insects. For a more contemporary touch, I consider aluminum or stainless steel, providing longevity without rust issues.
Select composite materials combining wood fibers and plastics, ensuring low maintenance and water resistance. Additionally, high-density polyethylene (HDPE) is another excellent choice, as it mimics wood’s appearance and stands up to harsh weather.
I prefer weather-resistant fabrics for cushions, such as solution-dyed acrylic or polyester. These materials don’t fade easily and withstand moisture effectively.
For finishes, I use marine-grade varnish or exterior-grade paint to protect wooden surfaces. These coatings enhance longevity while maintaining aesthetic appeal.
When choosing fasteners, stainless steel or coated screws ensure corrosion resistance, adding to the overall durability of the piece.
Designing Custom Outdoor Furniture Plans
Begin with measuring the available space in your yard or patio to determine the dimensions of the pieces you intend to create. Accurate measurements help ensure that each item fits harmoniously within the outdoor setting.
Sketch designs on paper or use specialized software to visualize the final product. Include all angles and details, such as storage options or integrated seating areas, which add functionality.
Select a design style that complements your existing environment–be it modern, rustic, or minimalist. Research online for inspiration, assessing proportions and symmetry that appeal to you.
Create a materials list tailored to your chosen designs, factoring in the required quantity for each component. This helps to avoid surprises during construction, ensuring that all necessary parts are on hand.
Draft step-by-step instructions for assembling each piece. Clear directions facilitate efficient construction, enabling adjustments based on your preferences or unanticipated challenges.
Incorporate features that enhance comfort, such as ergonomic seating angles or adjustable elements. Testing these concepts beforehand can refine the usability of each item.
Finally, envision how different paint or stain finishes can enhance aesthetics while protecting the surfaces. Samples can aid in deciding color schemes that resonate with your outdoor theme.
Essential Tools for Crafting Outdoor Decor
The right tools can significantly impact the quality and ease of the crafting process. A circular saw is indispensable for cutting wood accurately and efficiently. Invest in a miter saw for precise angled cuts, especially for pieces that require a polished finish.
A durable drill is necessary for driving screws and making pilot holes. Choose one with adjustable speed settings to cater to various materials. Don’t forget drill bits designed specifically for wood; they offer cleaner holes and reduce splitting.
A sturdy tape measure ensures accurate dimensions for each element. Combine this with a square to check the angles, ensuring everything fits together seamlessly. A level will help maintain stability; it’s critical for seating and table surfaces.
Clamps are vital for holding components during assembly. They provide stability, allowing for more precise work and reducing the chances of accidents. A good workbench or sawhorses can support larger projects and provide a stable surface for measurements and cuts.
For finishing touches, sanders will smooth rough edges and surfaces. An orbital sander is effective for larger areas, while a detail sander works well on intricate designs.
Finally, safety equipment is non-negotiable. A quality pair of safety goggles, gloves, and ear protection will ensure a secure crafting experience. Focusing on using the right tools will enhance the quality of your creations while ensuring personal safety throughout the process.
Step-by-Step Guide to Assembling Your Furniture
Begin with a clean, flat surface for assembly. Gather all pieces, ensuring nothing is missing. Organize screws, bolts, and other fasteners to avoid confusion.
1. Gather Required Items
- Wood components
- Fasteners (screws, brackets)
- Tools (drill, screwdriver, measuring tape)
2. Follow the Plan
- Refer to the design blueprint carefully. Verify dimensions.
- Lay out pieces in the order of assembly.
For each step, check for the right orientation of parts. Use a measuring tape to ensure everything is aligned correctly before securing components. Tightening screws too early can lead to misalignment.
3. Assembling the Frame
- Begin with the base. Connect side pieces to the bottom part using brackets.
- Add vertical supports, ensuring they are plumb with a level.
- Connect top pieces securely to complete the frame.
Once the frame is secure, check for stability. If wobbling occurs, adjust until it feels solid.
4. Attaching Surfaces
- Align tabletops or seating surfaces carefully to avoid gaps.
- Secure each surface using pre-drilled holes.
- Double-check that screws are evenly tightened.
Lastly, inspect all joins and fasteners once more for proper tightness. This step ensures longevity and safety.
5. Finishing Touches
- Sand any rough edges for comfort and aesthetics.
- Apply sealant or paint for added weather resistance.
After finishing, allow sufficient drying time before usage. Regular maintenance checks are recommended to ensure enduring performance.
Finishing Techniques to Protect Against Weather
Choosing high-quality sealants is paramount for durability. I prefer using marine-grade varnish or exterior paint, which offer superior protection against moisture and UV rays. Look for products specifically designed for outdoor applications, as they provide tailored formulations that resist peeling and fading.
Before application, ensure wood surfaces are clean and sanded smooth to allow for better adhesion. I often apply at least three coats of finish, allowing each coat to dry thoroughly between applications. This creates a thicker protective barrier, enhancing resistance to harsh conditions.
Using penetrating oil finishes like teak or tung oil provides a natural appearance while still offering water resistance. With these, I ensure to reapply periodically, typically every six months, to maintain optimal protection.
For metal structures, galvanizing or powder coating is effective. These methods provide a robust shield against rust and corrosion, especially in humid environments. Regular maintenance, such as cleaning and inspecting for scratches, helps maintain the protective layer and extends the metal’s lifespan.
Finally, consider using covers when items are not in use. This additional step prevents direct contact with rain, snow, and sun, thus extending the life of the finish and underlying materials.
Maintenance Tips for Longevity of Your Creations
Regularly inspect and clean surfaces using a mild detergent mixed with water to remove dirt and grime. Avoid abrasive cleaners that can damage finishes.
For wooden pieces, apply a protective sealant or outdoor-grade oil every year. This helps to keep moisture out and prevents warping and cracking. Choose products designed specifically for the type of wood used.
Metal structures must be checked for rust signs. Clean any affected areas and apply a rust-inhibiting paint to prevent further corrosion. Ensure to reapply this coating at least once a year.
Fabric cushions benefit from seasonal cleaning to eliminate mildew and stains. Use a soft brush and a gentle upholstery cleaner. Storing them indoors during harsh weather will significantly extend their lifespan.
Position all items strategically away from direct exposure to harsh elements, particularly sun and heavy rain. Utilizing coverings can also protect against unexpected weather changes.
Periodically tighten screws and joints to maintain stability and safety. Loose parts can lead to damages over time, so it’s advisable to check all connections regularly.
If you notice any significant damage or wear, addressing it immediately will prevent further deterioration. Repair or replace components as necessary to keep everything in top condition.