First, gather necessary tools: fine-tipped paintbrushes, painter’s tape, a level, and your choice of paint or stain. Ensure the surface is clean and dry before applying tape to create sharp, straight lines. Use the level to determine the height at which you want your stripes, marking spots along the edge with a pencil for alignment. This precision prevents uneven lines and enhances the overall appearance.
Before commencing with the application, test your paint on a small area or scrap material to see how it looks once dried. This step also lets you gauge the opacity and adjust accordingly. When ready to paint, carefully apply your chosen color within the taped sections.
Allow the first coat to dry completely, then apply a second coat if needed for even coverage. Once the paint dries, gently remove the tape at a 45-degree angle to avoid lifting any paint. By following these methods, you will create an eye-catching upgrade that modernizes your interior space.
Technique for Decorative Stripes on Surfaces
Choose high-quality painter’s tape to ensure clean lines. This step greatly impacts the final appearance. Measure and mark the placement using a pencil and ruler for precision.
Supplies Needed
- Painter’s tape
- Acrylic or enamel paint
- Small paintbrush or striping brush
- Drop cloth or newspaper
- Clear sealer (optional)
Step-by-Step Instructions
- Prepare the surface by cleaning it, ensuring it’s free from dust and grease.
- Apply painter’s tape along the marked lines, pressing firmly to prevent paint bleed.
- Use the chosen brush to carefully paint between the tape. Multiple thin layers yield better results than a single thick one.
- Allow the paint to dry completely before removing the tape. Pull the tape off at a 45-degree angle for sharper edges.
- If desired, add a clear protective layer once the paint is fully cured to enhance durability.
Experiment with different colors and widths for unique designs. Ensure that you keep consistency in spacing for a professional finish. Mixing shades can add depth and personality to your designs.
Choosing the Right Paint and Tools for Pinstriping
For achieving sharp and clean lines, I recommend using enamel paint, specifically designed for detailing work. These paints adhere well to various surfaces and provide a glossy finish. Look for brands like One Shot or Sign Painting Enamel, which are favored in the industry.
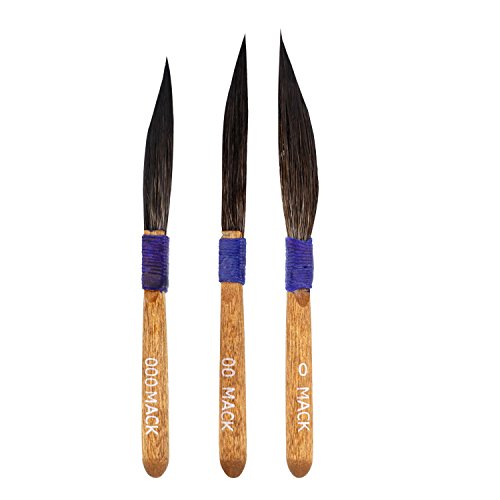
Brush selection is crucial; a fine-tipped brush, typically a 00 or 000 size, gives greater control over the line precision. A striping brush with long, flexible bristles allows for smoother, uninterrupted strokes. Practice with different brushes to find one that feels comfortable in your hand.
A clearcoat will seal and protect your work, enhancing durability. Use a spray or brush-on clear polyurethane or acrylic finish to ensure longevity. Apply it generously, following the manufacturer’s instructions for best results.
For surface preparation, make sure to clean and, if needed, lightly sand the area where you will apply the paint. This adheres the enamel effectively. A degreasing agent can remove any oils or residues.
To simplify the process, a tape can assist in creating clean edges and guiding the brush. Experiment with different widths to achieve varied line thicknesses. Consider a reliable masking tape that doesn’t leave residue when removed.
Having a steady hand is vital. If you’re concerned about precision, a steadying adjustable table or clamp can secure the piece while I work. Keeping paint, brushes, and tools organized will help minimize distractions.
Preparing the Surface for Stripes
Begin with thorough cleaning. Remove dirt and grease using a mild detergent mixed with warm water. A soft cloth or sponge works effectively–avoid abrasive materials to prevent scratches.
Sand the Area
Utilize fine-grit sandpaper (220 grit) for a smooth finish. Lightly sand the area where the design will be applied, ensuring to remove any previous finishes. This step enhances paint adhesion and helps produce sharp lines.
Dealing with Imperfections
Inspect the surface for dents or scratches. Fill any imperfections with wood filler, and allow it to dry completely. Sand the filled areas to ensure they are flush with the rest of the surface, maintaining a uniform look.
Finally, wipe down the surface with a lint-free cloth to eliminate any dust particles. This preparation paves the way for clean, crisp lines in your artistic endeavor.
Creating a Design Template for Accurate Pinstripes
Draft a template on a sheet of paper, reflecting your desired layout. Utilize graph paper for precision in dimensions and spacing. This approach helps visualize how lines interact with the piece’s contours. Make sure to measure any existing patterns or features on the surface as a reference point.
Utilizing Tools for Precision
Transfer your design onto the surface using transfer paper or a light pencil sketch. Ensure you have a steady hand and a ruler for straight lines. If you prefer a more flexible option, use painter’s tape to outline stripes, keeping them uniform while allowing for curves or angles.
Testing the Design
Before applying paint, test the template on a scrap material similar to your item. This will allow you to refine spacing and adjust any inconsistencies. Pay attention to the drying time of your materials; this will inform how long you can wait before applying additional layers or mistake corrections.
Mastering the Technique of Pinstriping with a Brush
Achieving precision with a brush requires steady hands and controlled movements. I recommend practicing on scrap material before starting on the final piece. This builds confidence and helps to refine technique.
Brush Selection and Dipping
- Use a fine-tipped brush, preferably one designed for detailing work. These brushes allow for better control and smoother lines.
- Dip the brush into the paint, ensuring it’s not overloaded. Tap off excess paint on the rim of the container to prevent drips.
- For consistency, start with small amounts of paint and gradually add more as needed.
Technique for Applying Lines
- With a steady grip, begin at one end of the design. Apply even pressure to keep the line consistent.
- Maintain a slow, fluid motion. Rushing can lead to wobbly lines that require touch-ups later.
- For curves, practice slight wrist movements rather than turning your entire arm. This allows smoother transitions.
Always keep a clean brush and workspace. If the paint clogs the bristles, the quality of your lines will suffer. Regularly clean the brush during your work.
After finishing a line, assess it quickly. If adjustments are needed, correct them immediately while the paint is still wet. Once dry, it becomes challenging to modify mistakes.
Finishing touches can enhance the overall aesthetic. Consider adding highlights or shadows with a contrasting color to give depth to the design.
With practice, the application of fine lines becomes more natural and expressive. Keep refining your style as you gain experience.
Using a Pinstripe Tape to Achieve Perfect Lines
I recommend using pinstripe tape for achieving clean and precise lines. This material typically has a self-adhesive backing, making application straightforward. Begin by selecting a high-quality tape that matches your desired width for the stripes.
Before applying the tape, make sure to thoroughly clean and dry the surface. This prevents dust or debris from causing imperfections. I find that using a primed or painted surface enhances adhesion and results in sharper edges. Once prep work is done, gently apply the tape, ensuring it adheres firmly without bubbles or wrinkles.
For optimal straightness, consider using a straight edge or a level as a guide. If adjustments are needed, the tape can be repositioned before it fully adheres. After the tape is placed accurately, it’s time to add paint. I prefer using a small brush or spray paint for a smooth finish along the edges.
Once the paint dries, carefully remove the tape at a 45-degree angle. This technique reduces the risk of pulling up any underlying paint, leaving you with crisp, defined lines. If any touch-ups are required, a fine brush can easily handle small corrections.
Utilizing this method not only elevates the aesthetic of your project but also allows for creativity in design. Experiment with different widths and colors to achieve a personal touch. In my experience, practicing on scrap material can help refine technique before tackling the main piece.
Applying a Clear Coat for Protection and Finish
Choose a high-quality clear coat to safeguard your design. A polyurethane or acrylic-based finish provides durability and a crystal-clear appearance. Ensure the product is compatible with the paint used; oil-based paints work well with oil-based clear coats, while water-based paints should be paired with water-based finishes.
Application Process
Before applying the clear coat, allow the painted surface to cure for at least 24 hours. Lightly sand the surface with fine-grit sandpaper (400-600 grit) to achieve a smooth base. Wipe away any dust with a clean cloth. Use a brush or spray can for even coverage, applying thin coats and allowing sufficient drying time between layers. Aim for at least two to three coats for optimal protection.
Final Touches
After the final coat dries, inspect for imperfections. Lightly sand any rough spots, then apply a final, thin layer of clear coat. This will enhance the shine and ensure long-lasting resilience against scratches and wear. Keep the item in a dust-free environment while drying to maintain a flawless finish.
Maintaining and Repairing Decorative Stripes
To preserve the integrity of your designs, regularly dust with a soft cloth. For deeper cleaning, use a mild soap diluted in water, and always follow up with a dry cloth to avoid moisture damage.
If any sections show signs of wear or lift, sand down the affected area gently and reapply the finish. Use a matching acrylic glaze to ensure consistency in appearance.
Scratches can be addressed by applying a touch-up pen or marker that matches the hue of your artwork. Lightly blend the edges with a fine-grit sandpaper for a seamless repair.
Consider a long-lasting protective layer after maintenance. A spray-on polyurethane finish can shield against daily use, ensuring longevity and vibrancy of the artwork.
As needed, inspect the surfaces for peeling or discoloration. Act quickly to prevent further damage by re-touching areas that show signs of distress.
For complete repairs, it’s best to follow the initial steps utilized in application, ensuring that color and design are applied uniformly. Allow ample drying time between layers for an optimal outcome.
In the event of extensive damage, consider consulting with a professional for advanced restoration techniques. Here is a simple maintenance schedule I use:
| Task | Frequency |
|---|---|
| Dusting | Weekly |
| Deep cleaning | Monthly |
| Inspect for damage | Every 3 months |
| Reapply protective coat | Annually |


