For anyone looking to maximize room space, consider utilizing medium-sized shelving units in combination with a sturdy, thick mattress. This approach not only adds verticality but also enhances the room’s aesthetic appeal. Start by gathering a few essential pieces: two tall bookshelves and a solid base to support the sleeping surface.
Begin by placing the shelving units parallel to each other, ensuring they are secured to the wall for safety. To construct a stable platform, employ a large piece of plywood. This will serve as the foundation for your mattress, providing necessary support and preventing sagging. Make sure to choose materials that align with your personal taste and aesthetics.
Adding a simple set of stairs or a ladder will make access easier. You can use spare components from your existing collection to create a cohesive design or purchase additional pieces that complement your chosen style. Don’t forget about under-shelf lighting or storage solutions to keep the area neat.
Choosing the Right IKEA Bed Frame
For a project utilizing IKEA products, selecting a frame that aligns with your needs is critical. The MALM series features a minimalist design, offering versatility for various styles. Its sturdy construction supports customization and additional storage solutions underneath.
If you desire a higher elevation, consider KURA, which provides an adaptable structure perfect for incorporating personal touches like curtains or shelving for a cozy nook. The ability to flip it for different heights extends usability.


The HEMNES option boasts a classic look, integrating seamlessly into traditional or modern aesthetics. It includes built-in storage, combining functionality with style, making it suitable for compact spaces.
Pay attention to dimensions when choosing the frame to ensure it fits well in your designated area. Measure your ceiling height and ensure adequate clearance for movement and comfort.
Assess the material quality as well. Solid wood frames offer durability, while particleboard options are lighter and budget-friendly but may not withstand heavy loads over time.
Prioritize your personal style and decor to create a cohesive look. Mixing colors and materials can yield an eclectic appearance, while a matching finish evokes a more uniform ambiance.
Lastly, evaluate how much customization you want. Some designs come ready for modifications, allowing you to tailor them specifically to your preferences and spatial requirements, enhancing both practicality and aesthetic appeal.
Identifying Necessary Tools and Materials
The right tools and materials streamline construction, ensuring a robust and functional elevated sleeping arrangement. Below is my list of requirements.
| Tools | Purpose |
|---|---|
| Drill | For creating holes and assembling components |
| Screwdriver | To fasten screws securely |
| Measuring Tape | To ensure accurate dimensions and spacing |
| Level | To confirm the structure is even and balanced |
| Saw (if necessary) | For cutting any material to size |
Materials can vary based on design preferences and stability requirements. Here’s what I gathered:
| Materials | Details |
|---|---|
| Wood or Metal Beams | Framework components; choose durable options |
| Connecting Hardware | Includes screws, bolts, and brackets to secure elements |
| Plywood or MDF Board | For the sleeping surface and side panels |
| Safety Rails (if desired) | To prevent falls and enhance safety |
| Paint or Finish | For aesthetic appeal and surface protection |
Gathering everything in advance saves time and enhances the overall experience. I recommend verifying tool and material availability to avoid interruptions during assembly.
Measuring Your Room for Loft Bed Setup
To optimize space efficiently, I first measure the height of the room. A minimum clearance of 30 inches above the mattress allows for comfortable sitting. If the ceiling height is low, I opt for a shorter frame to ensure safety and comfort.
Next, I check the width and length of the area where the structure will stand. I leave at least 2 feet of space on each side for easy access and movement. Additionally, I assess nearby furniture to avoid obstruction and provide adequate walkways.
While measuring, I take note of any light fixtures, windows, or heating elements that might affect placement. Ensuring I have proper clearance from these features is crucial for functionality and safety.
I also account for the mattress dimensions, ensuring that it fits snugly on the frame without excess overhang. Using a tape measure, I double-check all measurements to confirm accuracy before I begin my project.
Documenting these dimensions in a sketch helps visualize the arrangement and make informed decisions. This preparation sets a solid foundation for the assembly and ultimately leads to a more satisfying setup.
Step-by-Step Assembly of the Bed Frame
Gather all components including side rails, slats, and cross beams. Check against the provided list to ensure nothing is missing.
1. Begin by attaching the side rails to the headboard and footboard. Use the designated screws and connectors to secure them tightly.
2. Insert the support beams between the side rails. Space them evenly to ensure stability; typically, two to three support beams will suffice.
3. Align the wooden slats across the support beams. Ensure they are evenly spaced, allowing adequate support for the mattress. Use the screws to fix the slats in place.
4. Double-check all connections to confirm they are tight and secure. This step prevents any wobbling or instability.
5. If included, attach the guardrails using the pre-drilled holes on the side rails. These provide additional safety.
6. Once the frame is assembled, carefully lift it into position. If necessary, you may want assistance to avoid damaging the structure.
7. Place the mattress on top, ensuring it fits snugly within the frame. This final step completes the setup.
Before using, inspect all joints and areas for any signs of weakness. Making adjustments early on will enhance stability and safety.
Enhancing Stability with Additional Support
For secure elevation, consider using additional supports beneath the structure. I found that placing sturdy brackets at the corners significantly reduces wobbling. Use L-brackets that can be easily attached to the legs, ensuring the frame is anchored firmly to the walls, if needed.
I also recommend inserting support beams across the width of the unit. A piece of plywood or a solid wood plank can act as a central brace, distributing weight evenly. Secure it with wood screws to reinforce the connection points between the vertical posts and horizontal planks.
For safety, install anti-tip wall anchors. These can be attached to the frame, providing extra stability by fastening it to the wall. It prevents any unexpected movements, protecting users, especially in taller setups.
In addition to these enhancements, I used a quality mattress that complements the frame’s specifications. Check the weight capacity and ensure the mattress is firm enough for adequate support without compromising comfort.
Last, regularly inspect all connections and supports after setup. Tighten screws and bolts as necessary to maintain solid construction over time, providing peace of mind and a secure sleeping environment.
Creating a Comfortable Mattress Area
Invest in a high-quality mattress that is compatible with your sleeping style. Consider memory foam for pressure relief or a hybrid design for balanced support. Measure the dimensions of the area to ensure a proper fit.
Utilize a sturdy mattress foundation to maintain structure and longevity. A slatted base made from solid wood enhances airflow, preventing moisture buildup.
Add a mattress topper for increased comfort. Look for options that suit your preferences, such as gel-infused for cooling or latex for responsiveness.
Incorporate bedding that complements the mattress. Select breathable sheets and a duvet to ensure a cozy sleeping environment, keeping in mind color and texture for aesthetic appeal.
Consider using a set of underbed storage drawers to eliminate clutter. This optimization creates more space and keeps essentials close at hand without sacrificing comfort.
Finally, enhance the ambiance with lighting solutions. A dimmable bedside lamp or string lights can create a relaxing atmosphere, perfect for unwinding after a long day.
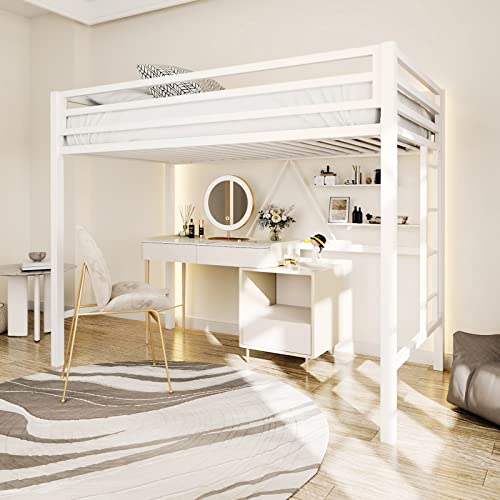
Designing Functional Storage Solutions Underneath
Consider utilizing modular shelving units from the Scandinavian brand to maximize vertical storage space. Placing them against the wall below creates an aesthetically pleasing and practical solution while ensuring easy access to items.
Incorporate storage boxes or baskets that can slide under the sleeping area. This keeps belongings organized and hidden, maintaining a tidy atmosphere. Choose assorted sizes to accommodate different items, from books to clothing.
Utilize a rolling cart, which can serve as both a cosmetic accent and a mobile storage option. This provides flexibility while effectively holding crafting materials, office supplies, or games, facilitating easy movement throughout the area.
Consider a small desk or worktop that fits snugly under the elevated sleeping space. It acts as a dual-purpose area for studying or working and provides drawers or compartments for essential supplies.
Implement hooks or pegboards on the wall to store frequently used items, keeping surfaces clutter-free. This solution adds a creative flair and offers easy access to accessories or tools.
Lastly, ensure proper lighting underneath the raised area. Adding LED strip lights enhances visibility and creates a cozy ambiance, making the storage area more user-friendly and inviting.
Incorporating Safety Features for the Loft Bed
Integrating a secure sleeping area is paramount. I recommend adding guardrails on both sides, ensuring they are at least 5 inches higher than the mattress. This helps prevent accidental falls, especially when children use the elevated space.
Utilize an anti-slip mattress pad, which can significantly reduce the chances of the mattress shifting or sliding. Secure the mattress with straps or Velcro if necessary to ensure stability during use.
Check the weight limit of the frame. I advise you to ensure that it can comfortably support not only the mattress but also additional items stored on or around it. Use furniture anchors to secure the frame to the wall, adding another level of stability.
Install a ladder with wide, grooved steps to promote safety while climbing. Ensure it is securely attached and consider placing it at an angle for easier access.
Regularly inspect all components. Over time, screws and joints may loosen. Tighten them periodically to maintain structural integrity.
Lastly, create a safe landing zone beneath. Keep the area clear of hard objects, and consider adding soft floor mats to cushion any potential falls. These features collectively enhance the safety of the elevated sleeping area, providing peace of mind during use.
Styling Your Elevated Sleeping Area for Maximum Aesthetics
Use a cohesive color palette that complements your personal style. Choose three to four colors that harmonize well together–consider neutral tones combined with a pop of color through accessories.
Layer bedding with varied textures. Opt for soft cotton sheets, a cozy quilt, and an array of decorative pillows. Mixing materials like linen, velvet, or faux fur can add depth and visual interest.
Incorporate fairy lights or LED strips. Adding ambient lighting around the perimeter of the sleeping zone creates a warm, inviting atmosphere, perfect for winding down.
Consider wall art that reflects your interests. Whether it’s framed prints, posters, or a gallery wall of personal photos, artwork can help define the space and infuse character.
Utilize space-saving accessories. Floating shelves or wall-mounted organizers can hold books, plants, or decorative items that enhance the aesthetics without taking up precious floor space.
Add greenery for a refreshing touch. Hanging plants or small succulents on the shelves can bring life indoors and improve air quality, adding to the serene atmosphere.
Incorporate a cozy reading nook underneath. Use a bean bag or small chair with a soft throw blanket, creating a perfect spot for relaxation and adding functionality to the area.
- Opt for a patterned area rug for softness underfoot.
- Consider adjustable curtains or shades to control light and privacy.
- Use hooks or pegs on the walls to display bags or hats, adding both organization and style.
Personal touches matter; incorporate elements that reflect who you are, whether that’s through unique collectibles, travel souvenirs, or favorite books displayed creatively. This accentuates individual style and enhances the overall look.
FAQ:
What materials do I need to build a loft bed using IKEA furniture?
To create a loft bed with IKEA furniture, you’ll typically need a few key materials. First, consider purchasing a solid bed frame from IKEA, such as the IKEA KURA or MALM series. You will also need plywood or MDF to create the lofted area and additional support. Additionally, securing tools like screws, brackets, and a screwdriver or drill is important. Don’t forget to include a comfortable mattress that fits the frame and safety railings if you have kids using the bed.
How do I ensure the loft bed is safe and stable?
Ensuring the loft bed is safe and stable involves proper construction and securing. Use sturdy brackets at all joint connections to provide extra support. It’s advisable to check the weight limit of the bed frame and make sure not to exceed it. Adding safety railings around the lofted area is crucial, especially for children, to prevent falls. Regularly inspect the bed for any signs of wear or looseness in the joints and tighten screws as necessary to maintain stability.
Can I customize the loft bed design to fit my room?
Yes, you can absolutely customize the loft bed design to fit your room! You can adjust the height of the bed by choosing different leg lengths or modifying the base. Additionally, consider incorporating shelving or storage underneath the loft, which can help maximize space. Painting or staining the frame different colors can provide a personal touch, allowing the bed to complement your existing décor.
What are some creative ideas for decorating under the loft bed?
There are several creative ideas for decorating the space under your loft bed. You could transform it into a cozy reading nook with cushions and a small bookshelf. It can also function as a study area with a desk and organized supplies. If you want a playful atmosphere, hang string lights and colorful banners. Another option is to add a play area for younger children with toys and an area rug. The possibilities are wide-ranging and can reflect your personal style.
Is it possible to disassemble the loft bed if I need to move it later?
Yes, most IKEA loft beds are designed to be easy to disassemble and reassemble. They typically come with a manual that outlines the steps to take them apart. Using appropriate tools, like a screwdriver or hex key, you can take the bed apart without causing damage to the materials. This feature makes it convenient for moving to a new location or repurposing the furniture in the future.
What materials do I need to build a loft bed using IKEA furniture?
To construct a loft bed with IKEA furniture, you’ll need a few key items. First, consider using an IKEA bed frame such as the MALM or HEMNES series, which are both sturdy and functional. You will also require plywood to create a base for the mattress if you choose a bed frame that doesn’t come with a slatted base. Additional materials include brackets and screws for securing the frame, a ladder or steps for access, and perhaps storage solutions like boxes or shelves that can be fitted underneath. Don’t forget tools like a drill, screwdriver, and level to ensure a balanced and secure build. Selecting a comfortable mattress is also important for a good night’s sleep.
How can I customize my loft bed to make the most of the space below?
Customizing your loft bed can enhance both functionality and aesthetics. One option is to incorporate shelving units or storage bins beneath the bed frame. This can help keep your space organized while making items easily accessible. If you’re looking for a cozy study area, consider adding a small desk and a chair underneath the loft. You might also want to personalize the space with decorative items, such as string lights or wall art. If you have children, adding a play area below can be a fun and inviting option. Using curtains or a fabric drape around the loft can also create a sense of privacy and make the sleeping area more inviting.


