

Using rubber gripper pads beneath the legs of tables and chairs can effectively minimize movement and slipping on smooth surfaces. These simple yet effective add-ons create friction that holds items securely in position, preventing any unwanted shifting during everyday use.
An alternative solution is to apply adhesive mounting strips on the bottoms of pieces, offering a reliable bond to the floor or other surfaces. This method is particularly useful for larger items that require a stable stance but may not be as easily moved. Make sure to choose high-quality options for durability and strength.
If adjustable height is an aspect of your décor, consider leveling feet that provide stability while compensating for uneven surfaces. These are especially helpful in spaces with hardwood flooring or irregular layouts. Installing them not only maintains balance but also prevents scratching the floor underneath.


Utilizing area rugs as barriers can also enhance the stability of smaller items. By providing a textured, non-slip surface, rugs prevent smaller pieces from sliding and can define zones within a room, adding both style and functionality.
Strategies for Securing Items
Using adhesive solutions such as silicone pads or rubber grips on the base of legs can significantly prevent slipping. These materials provide friction against the floor surface, ensuring stability and reducing movement. For carpets or rugs, utilizing non-slip underlays keeps items anchored while adding cushioning.
Weight Distribution Techniques
Rearranging the weight distribution among pieces can enhance stability. Heavier items should be placed lower in a stack or nearer to the floor, minimizing the risk of topple. Ensure that taller elements maintain a wider base, which creates a lower center of gravity.
Wall Attachments
Utilizing brackets, straps, or L-shaped fasteners can securely anchor items against walls. This method is particularly useful for tall shelving units or TV stands to prevent tipping. For additional security, consider investing in anti-tip kits that offer extra support during usage.
Using Anti-Slip Pads for Stability
I recommend placing anti-slip pads under the legs of your items to significantly reduce unwanted movement. These pads provide grip on various flooring types. They are particularly beneficial for hardwood, tile, or laminate surfaces.
For effective application, select pads made from materials like rubber or felt, as they offer superior traction. Choose the right thickness based on the weight of the piece. Heavier items may require thicker pads for optimal stability.
Measure the dimensions of the legs accurately before purchasing. A suitable fit ensures that the pads adhere well, preventing slipping during use. Here’s a quick reference table for common pad sizes:
| Weight Class | Recommended Thickness | Pad Material |
|---|---|---|
| Up to 50 lbs | 1/8 inch | Felt |
| 51 to 100 lbs | 1/4 inch | Rubber |
| 101 to 200 lbs | 3/8 inch | Rubber |
| Over 200 lbs | 1/2 inch | Heavy-duty rubber |
Applying these pads is straightforward. Clean the surface of the leg, peel off the adhesive backing, and press firmly onto the leg. Allow it to set for the recommended time before placing weight on it.
Regularly check the condition of the pads to ensure they haven’t worn down. Replacing them promptly will maintain stability and prevent damage to your floors.
Securing Furniture with Wall Anchors
To ensure stability and safety, I strongly recommend using wall anchors for larger items like bookcases or entertainment centers. This method effectively prevents tipping, especially in households with children or pets.
Types of Wall Anchors
- Toggle Bolts: Best for hollow walls, they expand behind the wall, providing excellent support.
- Expansion Anchors: Ideal for solid walls, these are driven into the wall cavity and expand for a secure grip.
- Strap Kits: These connect the item directly to the wall, distributing weight effectively, and are easy to install.
Installation Steps
- Select the appropriate type of anchor based on your wall’s material.
- Determine the desired position of the item against the wall.
- Mark the spots for the anchors, ensuring they align with the item’s mounting points.
- Drill holes according to the anchor type and insert the anchors into the wall.
- Secure the item to the anchors using screws or straps, ensuring a tight fit.
Regularly check the connections to ensure ongoing stability, and adjust as needed. This simple process significantly enhances safety and peace of mind in any living space.
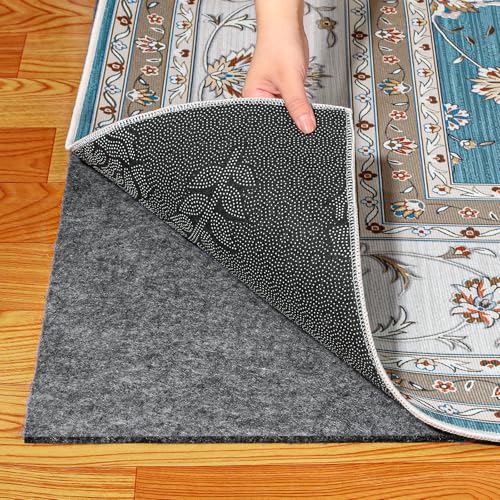
Employing Non-Slip Rugs to Prevent Movement
To ensure stability, I choose non-slip rugs with a solid rubber backing. This type of mat clings to the floor and minimizes any sliding or shifting that might occur over time. When selecting one, I pay close attention to the texture; a thicker and more textured surface offers enhanced grip.
Choosing the Right Material
Opting for materials like polypropylene or nylon works well, as these fabrics tend to resist wear and maintain their grip under pressure. Additionally, I check for a high density of fibers, which contributes to better performance against movement.
Layering Techniques
In some scenarios, layering a non-slip pad underneath a decorative rug amplifies stability. I found that using this combination allows me to enjoy the aesthetic appeal of various designs while ensuring they remain anchored. Regularly checking and adjusting these layers helps maintain their effectiveness over time.
Utilizing Furniture Straps for Added Security
I recommend securing larger pieces of your décor with furniture straps. These adjustable, durable straps can effectively anchor items like bookshelves, cabinets, or heavy appliances to walls, preventing tipping or shifting during everyday activities or unexpected events.
Installation Process
Begin by identifying the appropriate anchor points on the wall and the item. Use a stud finder to locate wall studs, as these provide the best support for the screws. Place the strap at the top of the item, drilling the screw into the stud before attaching the strap. This creates a sturdy connection. Repeat the procedure for the bottom of the item for maximum security.
Choosing the Right Straps
Select straps that are rated for the weight of the items you intend to secure. Look for adjustable options to accommodate changes in your arrangement. Materials like nylon or heavy-duty polyester offer higher durability, while metal clips can enhance stability. Ensure that the straps blend well with your interiors for a clean look.
Selecting the Right Furniture Coasters for Surface Protection
Choose coasters made of durable materials like rubber or felt to minimize scratches on hardwood or tile floors. These materials provide a soft buffer, allowing smooth sliding without damage. Ensure the coasters have a non-slip backing to prevent slipping under weight.
Types of Coasters
Opt for flat, wide designs that distribute weight evenly across the surface. This helps in balancing larger items, reducing the risk of indentations on soft surfaces. For heavier pieces, consider reinforced coasters that can handle increased pressure without deformation.
Size and Shape Considerations
Select sizes that match the base dimensions of your pieces for optimal support. Round or square shapes are common, but experimenting with custom sizes can enhance stability. Coasters should be thick enough to absorb vibrations while remaining inconspicuous under the item.
Applying Adhesive Products for Permanent Placement
For a robust solution, I rely on adhesive options such as construction adhesives or specialized furniture glues. These substances ensure that my items remain securely anchored, even under significant stress.
- Preparation: Clean surfaces thoroughly with rubbing alcohol to maximize adhesion. Dry surfaces are crucial for optimal bonding.
- Choosing the Right Adhesive: Select a product designed specifically for the materials involved. For instance, polyurethane adhesives excel with wood, while epoxy works well on metal.
- Application: Apply the adhesive in a continuous bead along the edges or center of the item. A good bead can significantly enhance strength.
- Clamping: After application, use clamps to hold the pieces together while the adhesive cures. Follow manufacturer guidelines for curing time to achieve desired results.
- Testing Stability: Once cured, gently test the integrity of the bond by applying pressure to ensure it has set properly before use.
This method provides a long-lasting solution that minimizes any chance of movement. Regular checks can ensure the bond remains intact over time.


